New Photon Based IoT PCBs

New IoTv2 PCBs

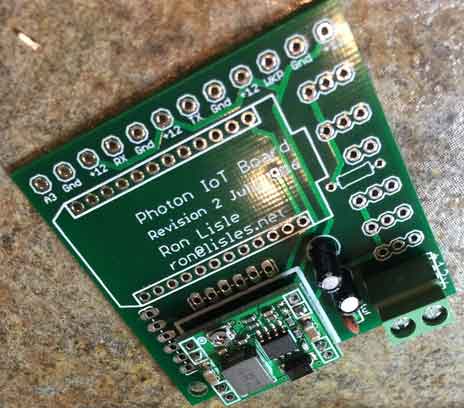
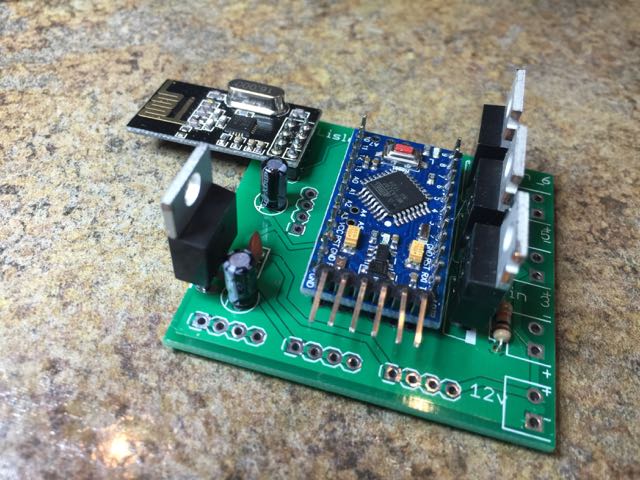
I’ve updated the printed circuit boards for my IoT projects. These boards are 5×5 cm and intended to be used in a variety of IoT applications. They include the following features:

  • Switch from linear voltage regulator to buck regulator.
    • The linear regulators used on my previous boards were getting quite warm as a result of converting the RVs +12 volts to +5 or +3.3v. I found some inexpensive variable voltage bucking regulators for about $1 each. These are marked “D-Sun”, readily available on Amazon.com, and they work well.
  • Provide direct pin-outs to LED driver boards.IoTv2 PCB with LED drivers
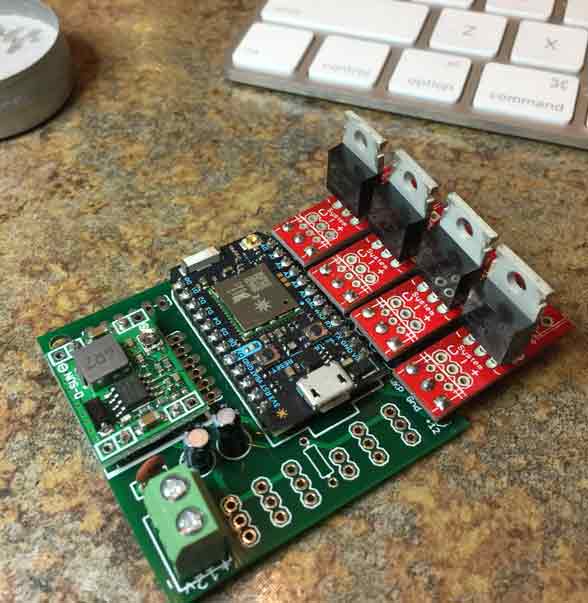
    • I’ve provided 4 sets of PWM pins that can interface directly with the Sparkfun 12959 MOSFET LED driver boards. I’ve positioned the pins such that standard header pins can be used to attach the boards instead of wires. I’ve gone back and forth about integrating the functionality directly, and finally concluded that the space used by the MOSFET and screw terminals was better pushed off onto small extension boards. Up to four of these can then be optionally added as needed. Sparkfun sells these for $4 each, so it’s sort of a no brainer. Putting them onboard would force me to moving to a larger 10×5 cm board, and only save a couple bucks.
  • Both 3.3v and 5v supplied
    • I’m using a 5v regulator to provide power to the Photon. It then has a 3.3v regulator for itself, and can provide 3.3v @ 100 mA to other sensors, etc. Since most of the Photons pins are 5v tolerant, this enables using both 3.3v and 5v sensors.
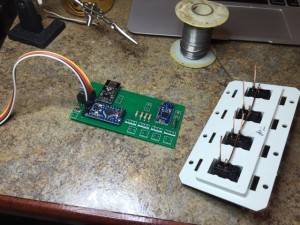
  • Provide groups of pins for ease of connecting other devices
    • To simplify adding additional sensors such as DHT11 temperature sensors, I’ve provided groups of pads that provide a GPIO, power, and ground. Some are 5v, and some are 3.3v. I was careful to ensure that the GPIOs provided with the 5v power groups are in fact 5v tolerant. These are great for things like PIR motion sensors, various switches, and so forth.

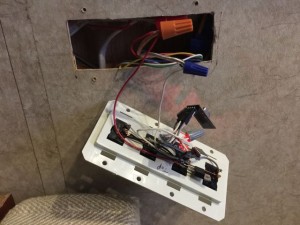
So after checking that the first batch of 10 boards work as intended, I’ve ordered another 10 and am in the process of replacing most of my existing controllers with these. While the Photon costs substantially more than the previous Arduino Pro Mini and RF24 radios, the ease of programming over the air combined with their robust design (5v tolerant pins, super stable operation) and included Particle.io support make these worth it!

I’m currently using my Echo and Dot to control these, but recently got AVS running on my Raspberry Pi and may throw that into the mix also.

If anyone is interested in using these boards in your own projects, post your request in the comments and I’ll provide links to the Eagle files so you can have boards made yourself. If you don’t mind waiting about 6 weeks, you can order these from itead.cc for $13 total for 10 boards. If you’re in a hurry, DHL shipping increases the total cost to about $26 total for 10 boards that arrive in less than 2 weeks. I ship with DHL for the first batch, then use the cheaper shipping to get more while I work with the first batch.

Note: I’ve now posted the Eagle files on Github.

MyRvApp

MyRvApp is an iPhone app that I’ve been working on to control my Arduino-equipped RV. The concept is pretty simple:

  • Display the floor plan of the RV
  • Controllable lights have circles overlaid to show their location
  • Tapping on a circle turns the light on or off
  • The color or alpha of the circle changes to reflect on/off state

Lights are controlled by Arduinos. These in turn communicate with each other over a simple RF24 radio network. One of the Arduinos is also connected to WiFi and Particle.io and serves as a bridge for all of the Arduinos.

Initially, lights will be hardcoded into the app. Going forward though, I’ll want the Arduinos to self publish information about their location and capabilities. This differs from HomeKit in that units are configured within each’s Arduino code. I’m doing this because I want to distribute the intelligence of the system across all of the units, instead of locating it all within a single point of control. I believe that this will result in a more robust, and eventually more intelligent system.

I’ll be creating a Github repo for this code and will be posting links here.

How to connect Echo’s Alexa to an Arduino

Introduction

As mentioned in my last post, I have connected my Echo to interface with my Arduino controlled RV lights. And thanks to the Particle.io Photon, this was quite easy. Perhaps the toughest part about this process has been getting past all the unfamiliar language used by Amazon, such as “Lambda functions”, “Skills”, and so forth. The actual implementation was fairly quick and easy, as I’ll explain in this post and the accompanying GitHub project.

Who is Alexa, and what is an Echo?

In a nutshell, the Amazon Echo is a small electronic device that you can interact with using spoken natural language. It has directional listening capability that allows it to hear you talk even in a noisy environment; for example when you’re playing the TV or stereo. It responds to you after you speak the work “Alexa”.

Requirements for connecting Alexa to your Arduino

You don’t have to own an Amazon Echo to get started. You can design and build a voice controlled interface, and test it using the Alexa Skills Kit (ASK) Service Simulator. The simulator allows you to type in what you would speak, and responds exactly as the Echo device would.

You’ll need to join the Amazon developer program, and setup an Amazon account to handle the backend. Both of these things can be done for free.

I’ve posted all the details on Github. I’ll warn you though; the instructions appear quite long. But don’t be deterred. None of the steps are particularly difficult, and the results are amazing!

I’ve been sharing tips and ideas with my buddy Don. He’s setup his Echo to control his pipe organ clocks. You can check out his work on facebook or at donholmberg.com. There’s also a blog article on Mutual Mobile’s website talking about some of our Arduino projects before connecting them to the Amazon Echo.

I’m having a blast working with all this new technology, and its fun to be able to use it to enhance my RV lifestyle!

Alexa Control of RV Lights

Today I finally got all the pieces working to allow Alexa to control my RV lights. It turns out that the Alexa code only took a couple hours to implement, using a great tutorial posted by Kevin Utter on the developer.amazon.com site. This tutorial shows how to implement in under an hour a trivia game using Alexa. I followed the tutorial, created first a Reindeer trivia game, and then modifying it to be a Lisles Trivia game.

Once I was familiar with the process, I followed similar steps to create my own RvDuino Echo app. This app uses Alexa to listen for commands, and then forwards them to Particle.io which forwards them to a Photon Arduino.

I didn’t have to write any code on Particle.io. Code running on the Photon instructs Particle.io what commands to listen for, and which Arduino functions to run as a result. It really doesn’t get any easier than that. This has really made me a big Particle.io fan now!

I then used the Particle web IDE to write a fairly small Arduino sketch on the Photon that routes commands received from Particle.io to the desired Arduino Pro Mini over a simple RF24 network.

I’ve posted all the information and code on Github: https://github.com/rlisle/alexaParticleBridge.

Replacing the Wall Switches

I’ve started replacing the lighting wall switches in my RV. Instead of hard-wiring the switches to the lights, I’m using radio connected Arduinos. The switches will appear to work the same, but what is really happening is that the switches are read by an Arduino, that then sends information over radio to another Arduino to control the LED light.

So why all the extra cost and complexity?

To begin with, the cost is not very much. The parts I’m working with amount to about $10 per board. As for the complexity, I have several objectives:

  • Enable dimming of the lights
  • Enable grouping of lights
  • Enable remote control

This last one is the exciting part. Once I get the internet connection working, I’ll be using my Amazon Echo to voice control the lights.

Wall switch with Arduino
Wall switches before using a PCB

So, where am I in this process? I had initially cobbled together a wall switch to remotely control ceiling lights over my desk.
As you can see in the picture, this was pretty fragile, with parts soldered directly to the switch pins. I had to resolder things after breaking things when installing it into the wall. This was part of my motivation for creating custom printed circuit boards.

Wall switch and PCB
Wall switch and PCB

In this photo you can see the new 5cm x 10cm PCB I created for mounting to the wall switches. On this board I’m not going to use any of the 4 LED driver circuits, so they are unpopulated.


PCB mounted to wall switch

And here you can see the new PCB mounted to the switch. The FTDI programmer is connected to the Arduino for programming. It will be disconnected when I install the board into the wall. The nice thing about this arrangement is that it simply mounts into the wall like any other light switch.

The small blue board on the right side is an HM-10 Bluetooth LE part. This provides BLE communication and Beacon capability. This was my first attempt at surface mount soldering. Total cost on this board, including PCB, was about $7.50.

Second batch of PCBs received

I finally received my second batch of printed circuit boards from ITead Studios. Delivery time was about 3 weeks. The total cost including shipping was $14.50 for ten 5cm x 5cm 2-sided boards! This is just amazing.

2nd Printed Circuit Board

The quality of the boards is very good. In the image above you can see that I’ve mounted most of the parts. These took me about 30 minutes to hand solder to the board. Starting from the left, going clockwise, they are:

  • 3.3v power regulator using an LD1117v33 and some capacitors
  • nRF24l01 radio
  • Arduino Pro Mini 3.3v
  • 3 x 30N06 power mosfet 12v LED drivers.

The unoccupied squares on the right were intended for screw terminals, but I picked the wrong size Eagle part template, so they don’t fit. I could easily update the Eagle files and order new boards, but I have decided to simply solder the wires for now. I’ll fix the problem once I use up the current batch of boards and need to order more.

These boards are small enough that they can fit through the 3″ hole in the ceiling used to mount the recessed LED lights that I’m using.

Total cost for this board and parts is under $10 each. I populated all 3 LED drivers, but only need to populate the number needed on each board going forward, reducing the cost by about a buck each.

Particle.io Photon is awesome!

Having worked out most of the kinks with using Arduino Pro Minis with RF24 radios to automate various things in my RV, it’s time to connect my private RF24 network to the Internet. I’m doing this primarily to allow integrating my Echo’s Alexa voice capabilities into the network. I purchased and have been waiting on the new Digistump Oak parts to integrate WiFi, but after months of waiting for it, and a couple recent delays, I decided to move forward getting familiar with the Particle.io build environment using the readily available Particle.io Photon part.

Particle Phone part on breadboard
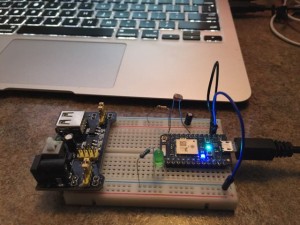
OMG, this $19 part is amazing! We’re talking immediate WiFi connectedness. The team at Particle.io has done an amazing job of providing a web-based Arduino environment. Connection to their servers was super easy, and the tutorials provided on their website will get you up and running quickly.

Since it’s web based, I can create and/or update code using my computer, or (at least eventually) any web browser, including the one on my iPad or iPhone 6+. I attempted to edit some code on my iPhone 6+, but while the IDE displayed within Safari ok, editing appears to be broken at this point. Judging by how well everything else is working, I expect that those geniuses at Particle will have this fixed before long.

I highly recommend taking a look at the Particle.io Photon.
Well done, Particle.io!

Designing Printed Circuit Boards with Eagle

It never ceases to amaze me how much of a nerd I am. I absolutely love computerized, electronic technology. I don’t mean playing with things like Xbox or owning the lastest stereo equipment. I mean playing with the stuff that is used to create today’s leading edge products.
As mentioned previously, I’ve been playing with Arduinos, and recently teaching others about them. But now I’m ready to really expand their use in my RV.
I currently have 5 Arduinos installed in my RV, all communicating using inexpensive RF24 radios (nRF24L01). I’m still shocked at how low cost these things are. Total cost for each is about $7. At that price, I want to put one on just about every light and switch in my RV.
The ones I’ve built so far were put together using small breadboards. This works ok for fast prototyping, and is fun and easy, but they probably won’t hold up very well as we’re bouncing down the road (I mentioned that this is an RV, right?)
So I’ve started looking at more robust solutions. This typically means using printed circuit boards. Many years ago I made my own PCBs, either by dry transfer decals or etch resistant pen. But it’s really hard work, yielded only fair results, and isn’t easy to duplicate. Photo-resist techniques were available, but expensive and fairly touch also.
But today things are different. After doing some research this weekend, I’ve discovered that really great results can be achieved very inexpensively. Software is available free for designing circuit boards, and mail-order PCB manufacturing has become ridiculously cheap. The down side is that there is a pretty steep learning curve to doing this.
So that’s what I’ve been doing this weekend; installing and learning to use the free version of Eagle software. This software is used by the professionals, for example those great folks at SparkFun and Adafruit. And that’s where I found some great tutorials on how to use it. And the kind folks at Eagle support student and hobbyist activities by providing a free version for them. They only ask that we purchase a license if/when we start doing professional work with it. How cool is that?
The Eagle software is then used to create what is called “gerber” files. Gerber files can then be sent to a PCB shop for production.
The cost to do this? It depends on the size of the board made. But so far, my circuits ideas have been fairly small because I intend to use lots of small, simple units instead of fewer more complicated circuits. So I expect that any of my designs will fit onto a 5cm x 5cm board. These will cost me about $10 for 10 at iTead Studios. Yes, that’s about $1 each.
I can’t wait to get my designs onto PCBs!

Playing with Arduino

I’ve been busy playing with Arduinos these past few months. I think I must have been locked in a cave the past 8 years or so. I’ve been shocked by how advanced and inexpensive these things have become. These things are awesome, and very inexpensive. I plan on installing a dozen or so throughout my RV to control just about everything. Couple that with my iPhone programming skills, HomeKit, Siri, and the new Amazon Echo, and this is going to be a high tech playground for me. Woohoo!

I had been struggling with getting nRF24+ radios working, to provide cheap communication between Arduinos. It turns out that a bunch of folks at MySensors have already implemented a very cool, open source solution along the same lines. This is an incredible site. The information there really helped me get my radios working. They’ve done a lot of good work to provide clear instructions on how to connect multiple Arduinos together using open source software. These Arduinos can then read various types of sensors in order to control all sorts of things. I feel like a kid in a candy store (“ooh, which one do I want next?”). The crazy part is the price of these parts. They have a really well done page listing out links to buy all the various parts at unbelievable prices. Thank you MySensors!

Unfortunately, I think I’ve let myself become spread too thin across exploring and playing with all these cool technologies. I’ve written an iPhone app and Apple Watch extension that uses the Lightblue Bean to display the level of the RV remotely. I got it working well enough to use for myself, but I haven’t taken the final steps to post it to the App Store so that others can use it also. It’s very close to being in a state that can be released to the app store, but I’d rather play with new Arduino projects instead of spending the time to finish and submit it. I’ve also setup several Arduinos to control fans and lights in the RV, but they’re still sitting on the workbench. I’m trying to get them connected to the internet so the Echo and iPhone can control them.

So now I’m going to try to be disciplined with myself, and focus on getting a few basic pieces done and installed before worrying about adding more advanced features. With the 3 day weekend coming up, I’m hoping to get the Lightblue Bean installed in my closet to control a string of led lights based on sliding door microswitches, and an Arduino Uno hooked up to control dimming some LED recessed spotlights that I installe over my booth workbench. I’ll post back later about how that goes.

RV Automation using LightBlue Bean

I’ve started playing with the LightBlue Bean as a part of my RV Automation project. This $30 part combines a low power, 3.3v Arduino board with Bluetooth LE, several sensors, and an attached 3.3v watch battery. This means that it can be used to do a lot of jobs without any connections whatsoever, and it can talk with an iPhone over BTLE.

I first heard about this part from a github article that my friend Sean wrote. It’s a well written article, fun to read, and I recommend that you read it. Thank you, Sean.

What Can I Do With A LightBlue Bean?

Using Bluetooth

I think the best thing about this part is the built-in blue tooth.

iPhone Connection

I expect the bean to be a bridge from my iPhone to other Arduinos. BTLE makes it very simple to interface to an iOS device using

iBeacon

I may be able to take advantage of the fact that any BTLE device can be configured to act as an iBeacon. This will enable the iPhone app to determine proximity to it. This leads to all sort of automation possibilities:

  • Turning nearby lights on/off
  • Disabling security system when near
  • Unlocking doors

Of course, security will be important, so I’ll have to consider carefully the use of a passcode or some other system to prevent allowing unwanted access if my phone is stolen.

Using the built-in 3 axis accelerometer

The bean also includes a built-in 3 axis accelerometer. This means that it can detect motion in any direction.

Security System

One of the shortcomings of living in an RV is that it moves when walking around inside of it. I’m planning on turning this into an advantage, and use this as a component of my security system.

Leveling

The accelerometer will be used to help me level the RV when parking. Since gravity is indistinguishable from acceleration, it makes a great way to check for level. I’ll need a way to calibrate the level settings after mounting the bean, and I’ll want to convert the accelerator readings from Gs to angle for display on my iPhone.

Door Motion

Another possible application, but one I don’t plan on using at this time, would be to mount the bean to a door. Since it’s battery operated, this could be as simple as just sticking it onto a door.

Using the Temperature Sensor

This is a no-brainer, but does require me to think about where I mount it. Do I want interior or exterior temperature readings?

Using the RBG LED

Status Display

I expect to mount the LED such that it can be used for displaying status of some sort. It can display any color, and be dimmed and/or blinked, allowing for a large range of indications.

Interfacing with Other Arduinos

I expect the bean to be a bridge from my iPhone to other Arduinos using inexpensive RF24 parts. These can be purchased for under $2 each.

Replacing the Battery

I expect to connect it to my RVs 12v system eventually, so I don’t have to keep replacing batteries. This will require a 3.3v regulator. The LD1117v33 is available from Amazon for under $2.