How to connect Echo’s Alexa to an Arduino

Introduction

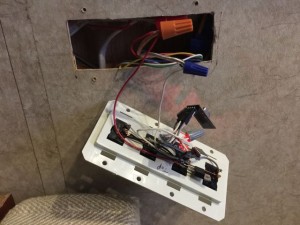
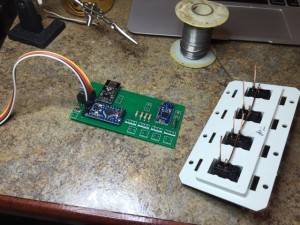
As mentioned in my last post, I have connected my Echo to interface with my Arduino controlled RV lights. And thanks to the Particle.io Photon, this was quite easy. Perhaps the toughest part about this process has been getting past all the unfamiliar language used by Amazon, such as “Lambda functions”, “Skills”, and so forth. The actual implementation was fairly quick and easy, as I’ll explain in this post and the accompanying GitHub project.

Who is Alexa, and what is an Echo?

In a nutshell, the Amazon Echo is a small electronic device that you can interact with using spoken natural language. It has directional listening capability that allows it to hear you talk even in a noisy environment; for example when you’re playing the TV or stereo. It responds to you after you speak the work “Alexa”.

Requirements for connecting Alexa to your Arduino

You don’t have to own an Amazon Echo to get started. You can design and build a voice controlled interface, and test it using the Alexa Skills Kit (ASK) Service Simulator. The simulator allows you to type in what you would speak, and responds exactly as the Echo device would.

You’ll need to join the Amazon developer program, and setup an Amazon account to handle the backend. Both of these things can be done for free.

I’ve posted all the details on Github. I’ll warn you though; the instructions appear quite long. But don’t be deterred. None of the steps are particularly difficult, and the results are amazing!

I’ve been sharing tips and ideas with my buddy Don. He’s setup his Echo to control his pipe organ clocks. You can check out his work on facebook or at donholmberg.com. There’s also a blog article on Mutual Mobile’s website talking about some of our Arduino projects before connecting them to the Amazon Echo.

I’m having a blast working with all this new technology, and its fun to be able to use it to enhance my RV lifestyle!

Alexa Control of RV Lights

Today I finally got all the pieces working to allow Alexa to control my RV lights. It turns out that the Alexa code only took a couple hours to implement, using a great tutorial posted by Kevin Utter on the developer.amazon.com site. This tutorial shows how to implement in under an hour a trivia game using Alexa. I followed the tutorial, created first a Reindeer trivia game, and then modifying it to be a Lisles Trivia game.

Once I was familiar with the process, I followed similar steps to create my own RvDuino Echo app. This app uses Alexa to listen for commands, and then forwards them to Particle.io which forwards them to a Photon Arduino.

I didn’t have to write any code on Particle.io. Code running on the Photon instructs Particle.io what commands to listen for, and which Arduino functions to run as a result. It really doesn’t get any easier than that. This has really made me a big Particle.io fan now!

I then used the Particle web IDE to write a fairly small Arduino sketch on the Photon that routes commands received from Particle.io to the desired Arduino Pro Mini over a simple RF24 network.

I’ve posted all the information and code on Github: https://github.com/rlisle/alexaParticleBridge.

iTead Studio Shipping Experiment

The least expensive PCB manufacturer that I’ve found so far is iTead Studio. They currently will create ten 5cm x 5cm 2-sided printed circuit boards for $9.90. Yes, that’s less than a dollar each.

They offer 3 different shipping options, so I decided to order 3 batches of PCBs, each using a different option, to assess the difference. I’ve now received all 3 batches, so can report my findings.

  1. Batch 1: ten 5cm x 10cm boards ($14.90) shipped least expensive ($4).
    Total turn around time: 4 weeks.
  2. Batch 2: ten 5cm x 5cm boards ($9.90) shipped medium cost ($4.50).
    Total turn around time: 3 weeks.
  3. Batch 3: ten 5cm x 10cm boards ($14.90) shipped most expensive (DHL $18).
    Total turn around time: 6 days.

Note that this was done in December, so I would expect future shipments to be faster when not done around the holidays. The processing time by iTead was about 3 business days.

On my first order, I had forgotten to include any dimension information in the gerber files. I received an email from iTead explaining what was needed, and providing a couple simple options for how to fix it. I uploaded a file to their site that included the needed info, and the order proceeded without delay.

So based on my results, I’m going to order parts using DHL shipping when I need fast turn around, and use the middle option when I have a the time to wait. For merely a 50 cent difference, I see no reason to ever use the cheapest option.

I am very impressed with the high quality and very low cost, and expect to continue doing business with iTead Studio for a long time.

Replacing the Wall Switches

I’ve started replacing the lighting wall switches in my RV. Instead of hard-wiring the switches to the lights, I’m using radio connected Arduinos. The switches will appear to work the same, but what is really happening is that the switches are read by an Arduino, that then sends information over radio to another Arduino to control the LED light.

So why all the extra cost and complexity?

To begin with, the cost is not very much. The parts I’m working with amount to about $10 per board. As for the complexity, I have several objectives:

  • Enable dimming of the lights
  • Enable grouping of lights
  • Enable remote control

This last one is the exciting part. Once I get the internet connection working, I’ll be using my Amazon Echo to voice control the lights.

Wall switch with Arduino
Wall switches before using a PCB

So, where am I in this process? I had initially cobbled together a wall switch to remotely control ceiling lights over my desk.
As you can see in the picture, this was pretty fragile, with parts soldered directly to the switch pins. I had to resolder things after breaking things when installing it into the wall. This was part of my motivation for creating custom printed circuit boards.

Wall switch and PCB
Wall switch and PCB

In this photo you can see the new 5cm x 10cm PCB I created for mounting to the wall switches. On this board I’m not going to use any of the 4 LED driver circuits, so they are unpopulated.


PCB mounted to wall switch

And here you can see the new PCB mounted to the switch. The FTDI programmer is connected to the Arduino for programming. It will be disconnected when I install the board into the wall. The nice thing about this arrangement is that it simply mounts into the wall like any other light switch.

The small blue board on the right side is an HM-10 Bluetooth LE part. This provides BLE communication and Beacon capability. This was my first attempt at surface mount soldering. Total cost on this board, including PCB, was about $7.50.

Second batch of PCBs received

I finally received my second batch of printed circuit boards from ITead Studios. Delivery time was about 3 weeks. The total cost including shipping was $14.50 for ten 5cm x 5cm 2-sided boards! This is just amazing.

2nd Printed Circuit Board

The quality of the boards is very good. In the image above you can see that I’ve mounted most of the parts. These took me about 30 minutes to hand solder to the board. Starting from the left, going clockwise, they are:

  • 3.3v power regulator using an LD1117v33 and some capacitors
  • nRF24l01 radio
  • Arduino Pro Mini 3.3v
  • 3 x 30N06 power mosfet 12v LED drivers.

The unoccupied squares on the right were intended for screw terminals, but I picked the wrong size Eagle part template, so they don’t fit. I could easily update the Eagle files and order new boards, but I have decided to simply solder the wires for now. I’ll fix the problem once I use up the current batch of boards and need to order more.

These boards are small enough that they can fit through the 3″ hole in the ceiling used to mount the recessed LED lights that I’m using.

Total cost for this board and parts is under $10 each. I populated all 3 LED drivers, but only need to populate the number needed on each board going forward, reducing the cost by about a buck each.

Particle.io Photon is awesome!

Having worked out most of the kinks with using Arduino Pro Minis with RF24 radios to automate various things in my RV, it’s time to connect my private RF24 network to the Internet. I’m doing this primarily to allow integrating my Echo’s Alexa voice capabilities into the network. I purchased and have been waiting on the new Digistump Oak parts to integrate WiFi, but after months of waiting for it, and a couple recent delays, I decided to move forward getting familiar with the Particle.io build environment using the readily available Particle.io Photon part.

Particle Phone part on breadboard
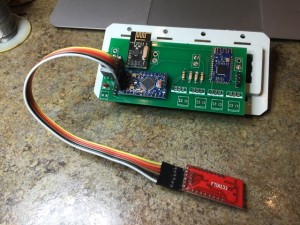
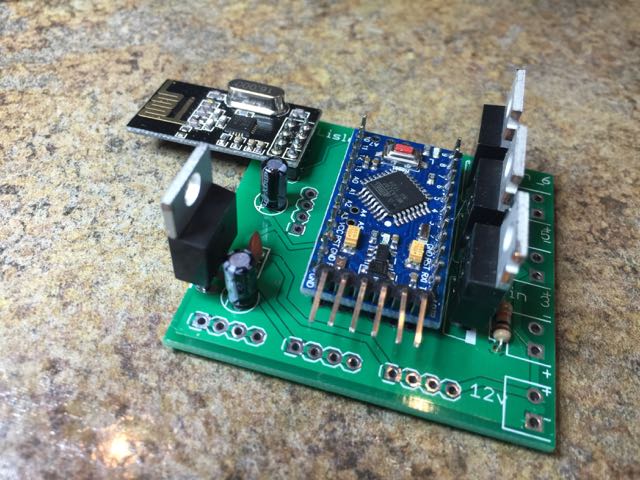
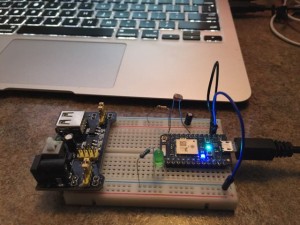
OMG, this $19 part is amazing! We’re talking immediate WiFi connectedness. The team at Particle.io has done an amazing job of providing a web-based Arduino environment. Connection to their servers was super easy, and the tutorials provided on their website will get you up and running quickly.

Since it’s web based, I can create and/or update code using my computer, or (at least eventually) any web browser, including the one on my iPad or iPhone 6+. I attempted to edit some code on my iPhone 6+, but while the IDE displayed within Safari ok, editing appears to be broken at this point. Judging by how well everything else is working, I expect that those geniuses at Particle will have this fixed before long.

I highly recommend taking a look at the Particle.io Photon.
Well done, Particle.io!

First batch of custom Printed Circuit Boards received!

Yesterday I received my first batch of custom printed circuit boards. Printed circuit boards arriving in a box These are actually the 3rd set of boards that I have ordered, but I paid for premium shipping for them. The first 2 orders were made almost a week before these, and haven’t arrived yet. I’m testing to see how long the various shipping methods take. I’ll post the results once all 3 shipments arrive.

These boards mount directly behind the 4-switch wall switches used in my RV. Each can support up to 4 PWM LED driver circuits plus bluetooth and RF24 radios.

I plan on installing a few of these during my holiday time off.

Designing Printed Circuit Boards with Eagle

It never ceases to amaze me how much of a nerd I am. I absolutely love computerized, electronic technology. I don’t mean playing with things like Xbox or owning the lastest stereo equipment. I mean playing with the stuff that is used to create today’s leading edge products.
As mentioned previously, I’ve been playing with Arduinos, and recently teaching others about them. But now I’m ready to really expand their use in my RV.
I currently have 5 Arduinos installed in my RV, all communicating using inexpensive RF24 radios (nRF24L01). I’m still shocked at how low cost these things are. Total cost for each is about $7. At that price, I want to put one on just about every light and switch in my RV.
The ones I’ve built so far were put together using small breadboards. This works ok for fast prototyping, and is fun and easy, but they probably won’t hold up very well as we’re bouncing down the road (I mentioned that this is an RV, right?)
So I’ve started looking at more robust solutions. This typically means using printed circuit boards. Many years ago I made my own PCBs, either by dry transfer decals or etch resistant pen. But it’s really hard work, yielded only fair results, and isn’t easy to duplicate. Photo-resist techniques were available, but expensive and fairly touch also.
But today things are different. After doing some research this weekend, I’ve discovered that really great results can be achieved very inexpensively. Software is available free for designing circuit boards, and mail-order PCB manufacturing has become ridiculously cheap. The down side is that there is a pretty steep learning curve to doing this.
So that’s what I’ve been doing this weekend; installing and learning to use the free version of Eagle software. This software is used by the professionals, for example those great folks at SparkFun and Adafruit. And that’s where I found some great tutorials on how to use it. And the kind folks at Eagle support student and hobbyist activities by providing a free version for them. They only ask that we purchase a license if/when we start doing professional work with it. How cool is that?
The Eagle software is then used to create what is called “gerber” files. Gerber files can then be sent to a PCB shop for production.
The cost to do this? It depends on the size of the board made. But so far, my circuits ideas have been fairly small because I intend to use lots of small, simple units instead of fewer more complicated circuits. So I expect that any of my designs will fit onto a 5cm x 5cm board. These will cost me about $10 for 10 at iTead Studios. Yes, that’s about $1 each.
I can’t wait to get my designs onto PCBs!

Arduino Hackathon

After about a month’s preparation, we successfully conducted an Arduino Hackathon this past Friday. It was great to get more folks at work excited about all the things that can be done using this technology. I’m really looking forward to seeing what folks do with it, now that they understand it and have seen how easy it is to use. I’ll add some links to the Mutual Mobile website once pictures get posted there.

Playing with Arduino

I’ve been busy playing with Arduinos these past few months. I think I must have been locked in a cave the past 8 years or so. I’ve been shocked by how advanced and inexpensive these things have become. These things are awesome, and very inexpensive. I plan on installing a dozen or so throughout my RV to control just about everything. Couple that with my iPhone programming skills, HomeKit, Siri, and the new Amazon Echo, and this is going to be a high tech playground for me. Woohoo!

I had been struggling with getting nRF24+ radios working, to provide cheap communication between Arduinos. It turns out that a bunch of folks at MySensors have already implemented a very cool, open source solution along the same lines. This is an incredible site. The information there really helped me get my radios working. They’ve done a lot of good work to provide clear instructions on how to connect multiple Arduinos together using open source software. These Arduinos can then read various types of sensors in order to control all sorts of things. I feel like a kid in a candy store (“ooh, which one do I want next?”). The crazy part is the price of these parts. They have a really well done page listing out links to buy all the various parts at unbelievable prices. Thank you MySensors!

Unfortunately, I think I’ve let myself become spread too thin across exploring and playing with all these cool technologies. I’ve written an iPhone app and Apple Watch extension that uses the Lightblue Bean to display the level of the RV remotely. I got it working well enough to use for myself, but I haven’t taken the final steps to post it to the App Store so that others can use it also. It’s very close to being in a state that can be released to the app store, but I’d rather play with new Arduino projects instead of spending the time to finish and submit it. I’ve also setup several Arduinos to control fans and lights in the RV, but they’re still sitting on the workbench. I’m trying to get them connected to the internet so the Echo and iPhone can control them.

So now I’m going to try to be disciplined with myself, and focus on getting a few basic pieces done and installed before worrying about adding more advanced features. With the 3 day weekend coming up, I’m hoping to get the Lightblue Bean installed in my closet to control a string of led lights based on sliding door microswitches, and an Arduino Uno hooked up to control dimming some LED recessed spotlights that I installe over my booth workbench. I’ll post back later about how that goes.