Patriot 4: Swift Programming IoT Home Automation

I’ve turned a corner in my thinking about how best to automate my home. For years now I’ve been trying to integrate and generalize all of the various technologies (MQTT, SmartThings, Particle.io, Alexa, iOS, Raspberry Pi, etc) to provide a simplified interface for controlling everything. The tough part is really describing what I want the system to do; how it behaves. Using an any sort of text or table driven, simplified, abstract programming model always comes up short. By this I mean the sort of approach where I am allowed to specify things such as “if device A is on, and the time is after HH:MM PM, then set device B to XX”. This works great for doing fairly simple things, but doesn’t really handle the more complex types of scenarios I always run into, or if it does handle it, it does so in a manner that gets very complicated and unmaintainable very quickly. As a professional programmer, this situation is very familiar, and describes what happens with poorly written code. So I started thinking about how to solve this problem in a way that would be greatly extensible and very maintainable.

And I got to thinking about how Patriot automatically detects new devices. Well, sort of automatic. If I program a Photon to expose a device, and write the Photon code to implement that device, then Alexa can detect it and control it with voice. That’s very cool, but I’m getting tired of having to tell Alexa which lights to turn on and off every morning and night. I want my home automation system to know when to do that based on the plethora of sensors that I’ve installed.

So then the big ah-ha moment for me. Automatically detecting and installing devices doesn’t provide any automation until I write some sort of specific code to control it. This could be generalized code such as IFTTT, or bare bones custom code like Photon C++ or Python code on a Raspberry Pi.

One of the issues that frustrates me is the large number of different programming languages and platforms I’ve had to work with. So recently I decided to replace my Raspberry Pi with a used Mac Mini in order to reduce the number of different programming languages, environments, and platforms I have to remember and work with. The 2010 Mac Mini is quite powerful and flexible, and I found one on craigslist for $150. It’s now my media center as well as my MQTT broker and home automation controller. And I can program it in Swift, which is my daytime job programming language.

So if I have to write code no matter what, why not do it using the best tools, environment, and clean programming practices? To my mind that means Swift programming on the Mac Mini.

So that’s where I’m going with Patriot 4. I’m writing a Mac app in Swift using clean, TDD code. I’ll be sharing the Swift framework that is evolving out of this, but it’s going to require Swift programming skills in order to use it. I’m excited to see just how far this can go.

Patriot iOS App

Patriot iOS appThis weekend I posted to GitHub the source code for a Patriot iOS app. This is a cleaned-up version of an app that I wrote awhile back to control Photon devices in my RV. The intent is to allow mounting old iPhone devices to the wall to use as control panels for my Photon controllers. Refer to my previous article about Patriot for information about the Particle.io code and Alexa skill.

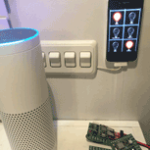
In the image here you can see 3 different ways of controlling a Photon controller. There is an Alexa sitting next to an iPhone 4s mounted to the wall next to several wall switches.

The Problem with Switches

The switches are connected to a Photon mounted in the wall behind them and actually broadcast particle.io events instead of directly controlling power to lights. They can control multiple lights, or even things that aren’t lights. I had intended to put a bunch of switches like these around my home, but there’s a problem with mechanical switches like these. They suggest a ‘state’ of on or off. So for example, typically a switch would be “on” if one way, and “off” if the other. However, if I turn a a light on by flipping a switch up, then I turn the light off by telling Alexa to turn it off, then the switch continues to indicate “on” but the light is actually off.

Alexa Smart Home Skill

The Alexa is running the Patriot Alexa smart home skill to dynamically determine the events that my IoT Photons are listening for, so I can tell Alexa to turn activities on or off. But as described above, this leaves normal switches indicating the wrong state. So I decided that I need some sort of switch that can change to reflect the state even when changed by other devices or switches.

Old iPhone Devices to the Rescue

So an obvious choice is to use motorized switches. Unfortunately I couldn’t find any in my parts locker. But I did come across several old iPhones and began to think about how extremely powerful these could be to control my IoT devices. So I wrote a simple control panel app that displays the state of a list of hard coded activities, and allows tapping on them to toggle their on/off state. I then purchased some cheap plastic iPhone covers for them that I mounted to the walls, and can just snap the iPhones into place to hold them on the wall. I ran a power wire over, and voila!

Nice, works ok, but my head nearly exploded when I started thinking about  all the ways these could be extended. Before I start going on about possible future enhancements, let me announce that I have cleaned this original code up, extended it to use the latest Patriot dynamic device discovery, and posted the Swift source to Github.


The Possibilities of Patriot iOS Control Panels

So now that we have a system that allows old iPhones to communicate with our IoT system, what are some of the things that we can do to leverage the incredible power of these cheap devices? Here’s just a short list of some things that I’ve come up with so far:

  • Utilize BLE to detect the presence of certain other iPhones to monitor my comings and goings. Turn on lights when I get home after dark, etc.
  • Put a BLE tag on my car and motorcycle to track when they are at home or away or being stolen. Combined with the above…
  • Coordinate with Alexa commands to dim or display the panels.
  • Provide other views such as video chat, monitoring outside, etc.
  • Mount one of these outside to use as a doorbell with camera and audio intercom.
  • Use the back facing camera to perform motion detection, face recognition, etc. This one really has my head spinning. I intend to start looking into OpenCV to see about replacing simple motion and proximity detectors with just the camera mounted on the iPhones.
  • Motion detection and GPS: since my home is an RV, these may prove handy for a lot of things.

And the list just goes on and on. So this iOS code is intended as just a starting point. I hope others will get involved and contribute also.

Self Discovering IoT System

I’ve been working for a couple years now to automate my RV using a combination of Particle.io Photon micro-controllers, an iOS app, and an Alexa skill. This has been fairly easy to do, due mostly to the ease of using the Particle.io API. Over the next year, in addition to adding additional functionality and more Photons, I hope to add Apple TV and Watch apps. This got me to thinking about how to make the system easier to configure and extend.

Since I’ve written all the software pieces myself (iOS app, Alexa skill, Particle sketches), up until now I’ve taken the expedient route of just hard coding the names of each controller into both of the apps. With only a single iOS app and Alexa smart home skill, this meant updating those two programs every time I added a new Photon, or extended one of the existing Photons. Not a big deal, albeit somewhat inconvenient.

However, recently I created an additional iOS app to allow using older iPhones to be mounted to the wall and used as control panels. Hard coding the names of the controllers into the apps means that I have to manually update each device whenever there is a micro-controller change. Now this is becoming a much bigger inconvenience.

So I’ve converted each micro-controller to be self registering with the system:

  1. Each Photon publishes several variables that list the device names it implements, in addition to what ‘events’ it listens for. These variables are exposed by the particle.io API and used by both the Alexa and iOS app to dynamically configure themselves.
  2. All applications use this information, instead of having to hardcode a list of commands.
  3. This functionality is built into a published IoT particle library, so copy/paste is minimized.

So now instead of needing to reprogram the Alexa skill and iOS control panel apps whenever I add a new controller, I just need to expose the data about that controller as described above, and all the applications pick it up.

I’ve posting the Photon and iOS code to Github, so please take a look and let me know what you think.

Using Old iPhones for IoT Control Panels

I’ve been thinking for awhile now about using my old iPhones in my IoT projects. They have touch displays, wifi, cameras, audio, accelerometers, and maybe GPS depending on how old they are. Plus they have almost no value once they get a few years old. The only real downside to using them is the fact that they’re a bit hard to program, but hey, that’s what I do for a living.

So this past weekend, I scrummaged through my old Apple parts boxes, and came up with (2) iPhone G, an iPhone GS, iPhone 4s, and iPhone 5.
Doing some research, I decided that the iPhone G is not really worth messing with for a couple reasons:

  1. The newest iOS support available is SDK4, so writing code to run on it would be difficult, and could not support the advanced features released over the past five years or so.
  2. The iPhone G does not have a rear facing camera. One of the features I want to eventually support is using the camera for a room monitor. But since the phone will be mounted to a wall, the normal front facing camera will be pointed into the wall.

That said, the support for iPhone 3GS is not bad, but it is limited.

  1. iOS 6 is supported
  2. Xcode 7.3.1 is supported, currently the latest Xcode.
  3. Swift is NOT supported. Swift requires iOS 7.

    Image of iPhone 3GS
    Using an iPhone 3GS for simple control panel

So just for fun, I created a version of the control panel in Objective-C for iOS 6 to run on the iPhone 3GS. This app simply displays images in a collection view, and calls the Particle.io API when one is pressed. I probably won’t add much more to this app, but instead develop a Swift version for use on the newer phones. I’ll add new features to that version, and leave the Objective-C version for just simple control operations.

Update: I’ve now posted a cleaned-up version of the app code to Github, and and article on Hackster.io.

MyRvApp

MyRvApp is an iPhone app that I’ve been working on to control my Arduino-equipped RV. The concept is pretty simple:

  • Display the floor plan of the RV
  • Controllable lights have circles overlaid to show their location
  • Tapping on a circle turns the light on or off
  • The color or alpha of the circle changes to reflect on/off state

Lights are controlled by Arduinos. These in turn communicate with each other over a simple RF24 radio network. One of the Arduinos is also connected to WiFi and Particle.io and serves as a bridge for all of the Arduinos.

Initially, lights will be hardcoded into the app. Going forward though, I’ll want the Arduinos to self publish information about their location and capabilities. This differs from HomeKit in that units are configured within each’s Arduino code. I’m doing this because I want to distribute the intelligence of the system across all of the units, instead of locating it all within a single point of control. I believe that this will result in a more robust, and eventually more intelligent system.

I’ll be creating a Github repo for this code and will be posting links here.

Arduino Hackathon

After about a month’s preparation, we successfully conducted an Arduino Hackathon this past Friday. It was great to get more folks at work excited about all the things that can be done using this technology. I’m really looking forward to seeing what folks do with it, now that they understand it and have seen how easy it is to use. I’ll add some links to the Mutual Mobile website once pictures get posted there.

Playing with Arduino

I’ve been busy playing with Arduinos these past few months. I think I must have been locked in a cave the past 8 years or so. I’ve been shocked by how advanced and inexpensive these things have become. These things are awesome, and very inexpensive. I plan on installing a dozen or so throughout my RV to control just about everything. Couple that with my iPhone programming skills, HomeKit, Siri, and the new Amazon Echo, and this is going to be a high tech playground for me. Woohoo!

I had been struggling with getting nRF24+ radios working, to provide cheap communication between Arduinos. It turns out that a bunch of folks at MySensors have already implemented a very cool, open source solution along the same lines. This is an incredible site. The information there really helped me get my radios working. They’ve done a lot of good work to provide clear instructions on how to connect multiple Arduinos together using open source software. These Arduinos can then read various types of sensors in order to control all sorts of things. I feel like a kid in a candy store (“ooh, which one do I want next?”). The crazy part is the price of these parts. They have a really well done page listing out links to buy all the various parts at unbelievable prices. Thank you MySensors!

Unfortunately, I think I’ve let myself become spread too thin across exploring and playing with all these cool technologies. I’ve written an iPhone app and Apple Watch extension that uses the Lightblue Bean to display the level of the RV remotely. I got it working well enough to use for myself, but I haven’t taken the final steps to post it to the App Store so that others can use it also. It’s very close to being in a state that can be released to the app store, but I’d rather play with new Arduino projects instead of spending the time to finish and submit it. I’ve also setup several Arduinos to control fans and lights in the RV, but they’re still sitting on the workbench. I’m trying to get them connected to the internet so the Echo and iPhone can control them.

So now I’m going to try to be disciplined with myself, and focus on getting a few basic pieces done and installed before worrying about adding more advanced features. With the 3 day weekend coming up, I’m hoping to get the Lightblue Bean installed in my closet to control a string of led lights based on sliding door microswitches, and an Arduino Uno hooked up to control dimming some LED recessed spotlights that I installe over my booth workbench. I’ll post back later about how that goes.

RV Automation using LightBlue Bean

I’ve started playing with the LightBlue Bean as a part of my RV Automation project. This $30 part combines a low power, 3.3v Arduino board with Bluetooth LE, several sensors, and an attached 3.3v watch battery. This means that it can be used to do a lot of jobs without any connections whatsoever, and it can talk with an iPhone over BTLE.

I first heard about this part from a github article that my friend Sean wrote. It’s a well written article, fun to read, and I recommend that you read it. Thank you, Sean.

What Can I Do With A LightBlue Bean?

Using Bluetooth

I think the best thing about this part is the built-in blue tooth.

iPhone Connection

I expect the bean to be a bridge from my iPhone to other Arduinos. BTLE makes it very simple to interface to an iOS device using

iBeacon

I may be able to take advantage of the fact that any BTLE device can be configured to act as an iBeacon. This will enable the iPhone app to determine proximity to it. This leads to all sort of automation possibilities:

  • Turning nearby lights on/off
  • Disabling security system when near
  • Unlocking doors

Of course, security will be important, so I’ll have to consider carefully the use of a passcode or some other system to prevent allowing unwanted access if my phone is stolen.

Using the built-in 3 axis accelerometer

The bean also includes a built-in 3 axis accelerometer. This means that it can detect motion in any direction.

Security System

One of the shortcomings of living in an RV is that it moves when walking around inside of it. I’m planning on turning this into an advantage, and use this as a component of my security system.

Leveling

The accelerometer will be used to help me level the RV when parking. Since gravity is indistinguishable from acceleration, it makes a great way to check for level. I’ll need a way to calibrate the level settings after mounting the bean, and I’ll want to convert the accelerator readings from Gs to angle for display on my iPhone.

Door Motion

Another possible application, but one I don’t plan on using at this time, would be to mount the bean to a door. Since it’s battery operated, this could be as simple as just sticking it onto a door.

Using the Temperature Sensor

This is a no-brainer, but does require me to think about where I mount it. Do I want interior or exterior temperature readings?

Using the RBG LED

Status Display

I expect to mount the LED such that it can be used for displaying status of some sort. It can display any color, and be dimmed and/or blinked, allowing for a large range of indications.

Interfacing with Other Arduinos

I expect the bean to be a bridge from my iPhone to other Arduinos using inexpensive RF24 parts. These can be purchased for under $2 each.

Replacing the Battery

I expect to connect it to my RVs 12v system eventually, so I don’t have to keep replacing batteries. This will require a 3.3v regulator. The LD1117v33 is available from Amazon for under $2.

HomeKit

I’ve been playing with Apple’s new HomeKit framework. It attempts to provide a way to integrated all your automated home devices, allowing a single app to control them all. Even better, Siri can be used.

This is still early, so we’ll have to see how it plays out. But you can bet I’m going to be looking at how to use this technology in my RV. I’ll be blogging about it going forward.

Lavaca and Bower and Grunt, oh my!

I had a couple weeks off over the holidays. Since we didn’t have any big plans, I wanted to take the opportunity to learn something different. So I chose to dive into learning Lavaca.

Lavaca is a “curated collection of tools” that provides a “web application framework designed to jumpstart development of hybrid and single page applications”. It is available free from Github.

I had really thought that this would be a fairly quick exercise. I’m already familiar with HTML, CSS, JavaScript, jQuery, PHP, and so forth. But I was in for a bit of a surprise. I guess in the past few years that I’ve been focused on learning iOS and native mobile technologies, the face of web development has changed. And it’s changed a lot.

I’m glad to say that the days of throwing together some HTML, CSS, and JavaScript files to create a static website are gone. Websites are now created using real software engineering practices such as build systems, automated testing, dependency management, and formal deployment mechanisms. Sure, one can still throw together some files and upload them using FTP, but why would one want to do so? The good news is that there are powerful, open source tools available to automate and manage the whole process. The bad news (for me) was that there are a bunch of powerful, open source tools that I needed to learn to use. But that’s not really bad news, is it?

I realized that I needed a project to work on. I’ve never been able to learn new things very well unless I could find some way to apply it. So I reached back into my past projects, did some looking around, and found that the Celestino Couture website that I converted to WordPress several years ago hadn’t been updated in about that long. So I contacted Rusty and Sergio and asked if I could use their website as an exercise in learning Lavaca, and with their ok, off I went.

My goal in this exercise is to create a responsive web design that will be easy to maintain and extend over time, and can be deployed natively to Android and iOS devices, as well as the web and other mobile devices.

So I created a test site, and started through the Lavaca Guide, taking side trips to go learn Bower, RequireJS, Node, Grunt, YUIDoc, Dust, LESS, and Jasmine. It’s been fun, and I still have a lot to learn and a lot to do to finish up the new website, but it’s been a great experience. I’m really delighted with what our web team has been doing with Lavaca, and glad to get a better handle on the capabilities of responsive web versus native apps.

So that’s what I did over the holidays. I’ve got to say that it has been a blast! I still have a lot of learning to do, but I’m really enjoying it.