In the last post I showed how to create an Alexa skill using the Alexa Skill Kit Command Line (ask-cli). In this post I’m going to show how to extend that skill to control the blue LED on a Particle.io Photon.
Prerequisites
This post assumes:
- You are already familiar with Photon development using the Particle.io IDE of your choice
- You have a particle.io account already setup.
- You have completed the previous post to create a starter Alexa skill using the ASK CLI.
Continuing Where We Left Off
By the end of the last post we had a working Alexa skill, although it didn’t really do anything interesting. Let’s change that and add some code to make it talk with a Photon controller using the particle.io API.
Let’s start by adding a couple intents to turn on and off a light:
Alexa, turn on the blue light
Alexa, turn off the blue light
Easy, right? We’ll add the intent first without it doing anything except responding “Ok”, then add the calls the the particle.io after that is working.
Basic Changes
Let’s start by changing the invocationName on line 4 of en-US.json to “my photon”. Now we can say “Alexa, tell my photon to …”.
Adding a New Intent

Adding an intent will require defining it in the en-US.json file, and then creating an intent handler in index.js.
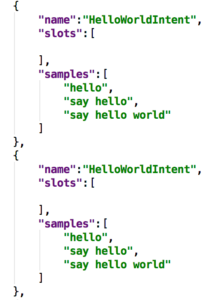
So open en-US.json in your favorite editor, and copy the entire HelloWorldIntent. After the copy, it should look as shown here.
Next edit the two copies to make them be our turn-on and turn-off intents.
Note: we could have used a single intent with a slot for the on/off state, but I’m trying to keep things very simple. Plus this allows you to use slang or fun expressions such as “light me up” or “gee, I feel blue”, etc.
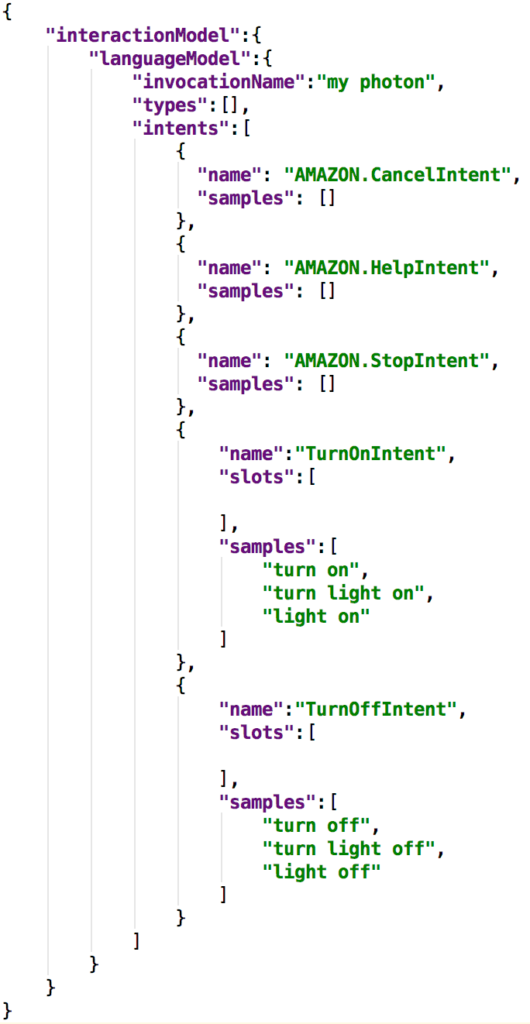
So now we should have a TurnOnIntent and a TurnOffIntent defined. Let’s delete the previous MyNameIsIntent. So the final file should look like this:

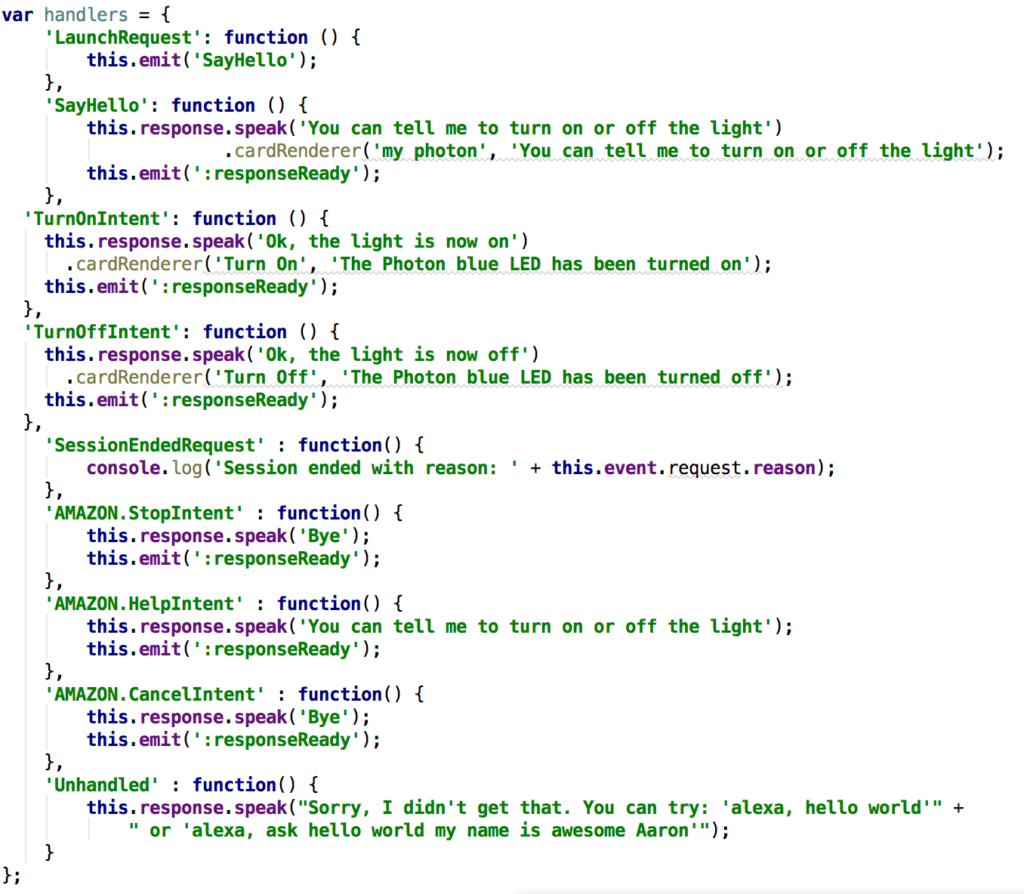
So now we need to handle the two new intents, and remove the deleted intent from the Lambda source. So open the lambda/custom/index.js file and make the following changes (or you can cut/paste the entire thing from the example below):
- Delete the ‘SayHelloName’ handler on line 29 through 34.
- Edit the ‘SayHello’ function to say something appropriate such as “You can tell me to turn on or turn off the light”. Update the cardRenderer() text similarly.
- Copy the same or similar text to the help intent.
- Delete the HelloWorldIntent and MyNameIsIntent
- Copy the SayHello intent twice
- Change the first SayHello copy to ‘TurnOnIntent’, and change the text to something like ‘Ok, the light is now on”, and provide more descriptive text in cardRenderer. The later is the text to be displayed on Show and in the Alexa app.
- Similarly, change the second SayHello copy to ‘TurnOffIntent’, and change the response and card text.
The index.js handler’s section should look similar to this after these edits:

Now deploy the changes by entering “ask deploy” again. Test the updated skill by saying “Alexa, tell my photon to turn light on”. Make sure that you previously enabled testing in the Alexa skill test tab.
Verify that all of the intents work as expected, including:
- Just launching the skill: “Alexa, open my photon”
- Asking for help: “Alexa, ask my photon for help”
- Turning on light: “Alexa, tell my photon turn light on”
- Turning light off: “Alexa, tell my photon turn off”
If all that is working as desired, let’s move on to sending on/off commands to the Photon via the particle.io and Patriot open source library.
Adding the Particle Javascript SDK to our Project
So now on to the fun part. Alexa can now handle commands to turn something on and off, so we need to forward those requests to the particle.io API.
We’re going to use the particle Javascript SDK. I had posted code to Github a couple years ago called alexaParticleBridge using raw HTML calls, but since then Particle published their SDK that makes this a lot simpler.
So first we need to fetch and add the particle-api-js package to our project.
- Edit lambda/custom/package.json to add the following line to the dependencies section:

- Within the lambda/custom directory, run “npm update” to fetch the particle sdk modules.
Now we need to add the Particle object to our code. Include the Particle object in index.js by adding the following line near the top below the line that includes the alexa-sdk:

Setting Up Alexa Account Linking
Before we can call the methods of the particle object to communicate with our device, we need to give Alexa the credentials needed when calling the Particle API. We could hardcode our Particle account username and password into the skill, but that would be unwise and is totally unnecessary. Both Alexa and Particle.io provide support for using OAuth2.
Without getting into the messy details, what OAuth2 does in this case is to allow the Alexa skill to call a webpage provided by Particle.io. That webpage prompts the user to enter their username and password, and if valid will forward an access token to the Alexa skill that it can use to access the API. The Alexa code never has to know or even see the user’s credentials. How cool is that?
To get Alexa Account Linking working, we don’t really need to understand how OAuth2 works. We just need to know where to get the information needed. I’m going to step us through doing that.
Note: currently it doesn’t appear that the ask-cli supports uploading Account Linking information, so we’re going to need to enter the information directly into the Alexa developer website for the skill.
So open up a browser window to you Alexa developer account, and browse to the skill’s Configuration tab. The Endpoint information should already be filled in. Below that is the scary looking Account Linking radio button. Select Yes and a bunch of cryptic entry fields will appear. Let’s fill then in one-by-one:
- Authorization URL:Â https://api.particle.io/oauth/authorize
This tells Alexa the URL to display to prompt the user for their account login. This is a Particle.io provided website. - Client ID: particle
This is provided to the Particle.io authorization URL. We will generate this in the next step, but for now enter “particle”. - Domain List (optional):
Leave blank. It isn’t needed. - Scope: none
Click on the Add domain button and add the scope ‘none’. It isn’t currently used, but may cause problems if something isn’t entered here. - Redirect URLs
These are filled in for you. We don’t use them, so you can ignore them. - Authorization Grant Type: Auth Code Grant
Select Auth Code Grant - Access Token URI:Â https://api.particle.io/oauth/token
This provides Alexa with the URI to use when requesting or refreshing an access token. It is provided by Particle.io. - Client Secret: particle
We will generate this in the next step. For now enter “particle”. - Client Authentication Scheme: HTTP Basic
Leave this the recommended default. - Permissions:
Leave these all unchecked.
Save this page. We’ll come back and enter the actual Client ID and Client Secret later.
Make a copy of one of the Redirect URLs. We’ll need it to create the client ID and secret in the next step.
Generate an Oauth Client
We need 2 things to create an oauth client:
- Your particle.io access token
- The redirect URL from the previous step
To get your particle.io access token, log into your particle.io account and go to the IDE. Select Settings (the gear icon in the bottom left) and assuming that you are logged in, the Access Token will be displayed near the top left. Make a copy of it for use in a moment.
Now we need to use your access token along with the Redirect URL saved in the previous step to create a valid Oauth client. These instructions assume you are running on a Mac and using the Terminal, but you could use any program capable of issuing Curl commands.
- Open a Terminal or Command Line window
- Issue the following command, substituting your redirect url and access token:
- curl https://api.particle.io/v1/clients -d name=<your-skill-name> -d type=web -d access_token=<your-access-token> -d redirect_uri=<your-redirect-url>.
The response should include an id and secret. Make a not of these.
Warning: This is the only place that the secret will be displayed. Save it carefully. If you lose it and need it again later you will have to repeat the above steps to recreate a new id and secret.
Now go back to the Alexa Configuration page and enter and save the new Client ID and Client Secret you just created.
Whew! That should do it. Save this information, and restart your skill. When your skill is enabled in the Alexa app, it will display the Particle.io login screen where you can enter your user id and password. From then on, Alexa will automatically fetch a Particle.io access token that your code can use to access the Particle.io API.
Using the Access Token
Now that we’ve setup account linking, Alexa will pass an access token to our code with each request. It will be passed in the event session information event.session.user.accesstoken. Let’s update our code to get and save it.
var token = this.event.session.user.accessToken;
Sending Requests to Particle.io
Now all that’s left is to use the Particle object created to to send requests to our Particle devices using the token obtained above. So lets create a function to call the Particle API Publish function:

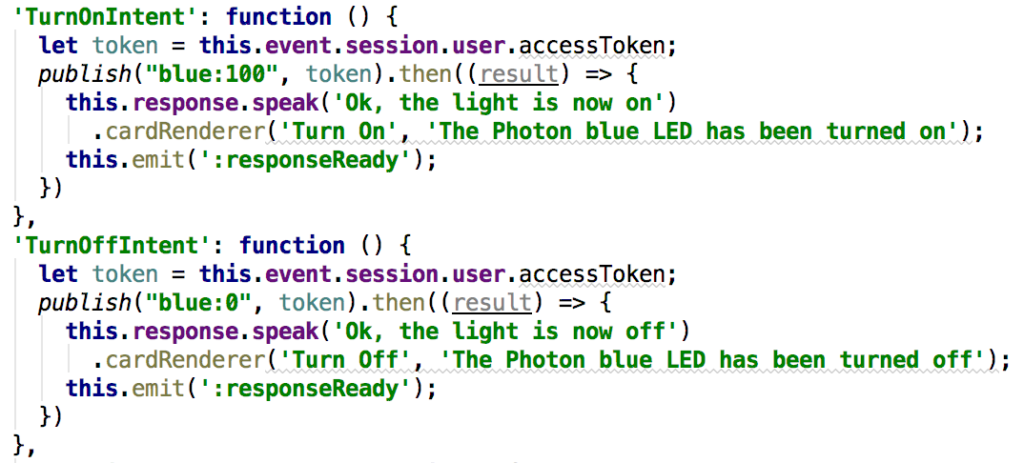
Now we can add calls to this method in our intent handlers, and Publish events to our Particle devices. Here’s the TurnOnIntent and TurnOffIntent will the calls to publish():

Note that a promise is used, and that emit is only called after the promise resolves. Also, the arrow function is used to allow “this” to continue to point to the response object.
So at this point we have a working Alexa skill that Publishes events to our Particle devices. In this example we used the device name “blue”. This needs to match the name you gave a device or activity in your Patriot code. I’m not going to duplicate the information about using Patriot, since I’ve posted several articles about that already. And of course you can call other particle API methods in addition to publish.
So this example should give you enough information to make function calls, set or read variables, and so forth. The complete project code is on Github. I hope you have as much fun with it as I have.
Caveat: I’m very much an intermediate Javascript programmer at best. I’m working with and learning from some really good Javascript programmers, but I’ve got a long way to go. Please don’t use my code as an example of the correct or best way to do things in Javascript.
