When Amazon announced the ASK CLI a couple months ago, it created a simpler and more powerful way of creating and updating Alexa skills. We’re going to use the ask-cli to create an Alexa custom skill. In the next blog post we’ll extend that skill to interact with a Particle.io Photon using open source Patriot code.
Before the ASK CLI was available, I had to open multiple browser windows and edit data directly in the Amazon Alexa developer portal and AWS Lambda console. As a professional software developer, I’m accustomed to using powerful editors and source code management tools such as Git to track my changes. Being forced to enter data into a web browser page leaves a lot of room for mistakes. And tracking those changes with Git means having to cut/paste from a tracked local file to the browser, again leaving room for more mistakes.
The ask-cli goes beyond just allowing local files to be uploaded to an Alexa skill. It provides a start-to-finish set of commands to create, update, and publish skills.
So let’s see how the ask-cli can be used to create a new Alexa skill from the ground up.
Install and Initialize the ASK CLI
Refer to the Amazon documentation for instructions on installing and setting up the alexa skills kit command line interface (ask-cli). You’ll need to configure it with your Alexa developer account and an AWS account using the “ask init” command.
Create a New Skill
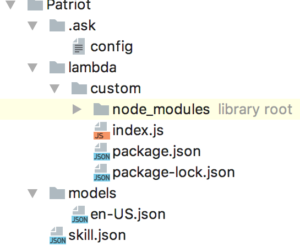
Now create a directory to contain your new skill, and run the “ask new -n <skillname> ” command. For example, I’m naming mine “Patriot”, so the command is “ask new -n Patriot”. This results in the following directory structure:

In one fell swoop we have created a basic “Hello World” Alexa custom skill. This includes the Alexa intent schema, utterances, and Lambda source and meta data. Pretty cool, eh?
Add Source to Git
If you use Git to track your source changes, now would be a good time to create a repo and add the files to it. This step is completely optional, but recommended.
Run the Skill
At this point, even without having changed anything, the new skill should work. Let’s upload it just to see:
ask deploy
If you’re accounts and ask-cli are setup correctly, then you should receive a series of messages indicating that the skill and lambda have been deployed correctly as shown here:
ask deploy

-------------------- Create Skill Project --------------------

Profile for the deployment: [default]

Skill Id: amzn1.ask.skill.your-new-unique-id...

Skill deployment finished.

Model deployment finished.

Lambda deployment finished.
Now if you check your Amazon Dev Alexa and AWS accounts, you should see that a new Alexa skill with the name you specified on the “ask new” command, and a Lambda named “ask-custom-<name>-default” have been created. The default invocation word for the skill created by “ask new” is “hello world”.
By default, the new skill is not enabled for testing. Go to the test tab in the developer.amazon.com Alexa console console and enable it, and then you can test “hello world” on your Alexa device (Echo, Dot, EchoSim.io, etc).
Edit the Source Code
Ok, so now that you’ve seen the awesome power of a fully functioning death star, er I mean Alexa skill, we can commence to editing it to do something that we want beside telling us hello.
Now begins the iterative development process:
- Updating the source
- Deploying the skill
- Testing the skill
- Repeat
I strongly recommend that you make tiny changes each iteration, and use Git to check in each step of the way. That way you can back up a step if something breaks and you cannot figure out what.
There are 2 main source code files you need to work with. For simple skills, that’s all you need to modify:
- models/en-US.json (if you’re in the US, otherwise named for your language)
contains the intents, slots, and utterances (now called samples)Â that Alexa will respond to. - lambda/custom/index.js
contains the response to each intent.
By default your new skill will say “Hello” in response to launching the skill eg. “Alexa, open hello world”, or “Hello <name>” in response to “Alexa, tell hello world my name is <name>”. I recommend playing with the existing code, making small changes to the skill, redeploying it, and verifying that your changes act as expected.
Here are some things to try:
- Change the response to the SayHello intent from “Hello World!” to “Hello whatever your name is”. This should require just a change to line 25 of index.js.
- Change the help response. This is on line 43 of index.js.
- Add some additional samples to en-US.json for the user to say to invoke the two intents. For example, add “whats up,” between “hello”, and “say hello”,.
- Change the invocationName in en-US.json. For example, change “invocationName”:”hello world” to “invocationName”:”ahoy matey”. In addition, change the response in index.js to “Welcome aboard!”
If you don’t include quotes or commas where needed, ask will happily upload the broken code, and you won’t know until you test the skill. This is where a good Javascript editor comes in handy.
I’m not going to try to cover all the details of coding an Alexa skill here. There are lots of tutorials and blog posts in addition to Amazon’s documentation. I leave that as a homework assignment for you.
In the next article I’m going to show how to update this skill to send on and off commands to the LED on a particle.io Photon.
