SmartThings Control of Photon Devices Using Patriot

SmartThings

So having finally received my SmartThings hub and a few devices, I’ve spent the past week learning how to program it to interface with my existing Particle.io Photon controllers running Patriot. It turns out that SmartThings has a fairly nice architecture that made automatically discovering my existing devices fairly easy. I needed to write a Service Manager SmartApp and a child Device Handler. Altogether this was about 200 lines of Groovy code (basically Java). The service manage interacts with Particle.io to locate each Photon controller on my account, and then ask it what devices it supports. It then creates a child device for each using the name exposed by the Photon. Voila!

This is essentially the same approach used by the Patriot Alexa Smart Home controller that I published for Alexa.

So yesterday when I finally got the kinks worked out, I reinstalled the Patriot Service Manager SmartApp that I’d written, and it automatically discovered my two dozen Patriot lights and added them to SmartThings. Woohoo!

So now I just need to explore the Alexa implementation on SmartThings and see if my Alexa Smart Home skill is still needed. At this point it looks like it can be completely replaced by the SmartThings Alexa support.

Switching to Samsung SmartThings

After a frustrating few weeks of unsuccessfully trying to get Home Assistant working with my Patriot Particle.io devices and Z-Wave bulbs, I’ve decided to switch directions and won’t be investing any more time on Home Assistant. While I really appreciate all the hard work that folks have put into Home Assistant, it just isn’t a good fit me.

So I am switching gears and am investigating integrating Patriot with the Samsung SmartThings hub instead. This will give me both Z-Wave and Zigbee control, and some level of operation when disconnected from the internet.

I’ve read through much of the SmartThings developer documentation, which is very good. I like the architecture, and clear descriptions of how to integrate 3rd party hardware.

I ordered a SmartThings Monitoring Kit from Amazon that should be here tomorrow in time to have some of my Holiday time off to play with it. This kit includes the SmartThings hub, a couple door sensors (with vibration and temperature sensing), an a/c switched outlet, and a motion sensor.

In searching the developer forums I’ve located some posts by others that have been successful in integrating SmartThings with the Particle.io cloud, so I’m confident that in no time I’ll have it controlling the plethora of lights, fans, and awnings that I currently control using Particle.io Photons and Patriot.

Teaching Alexa What To Do

In the last post I described combining an Alexa custom skill with an Alexa smart home skill. Well, I got that working this past week and it works great. The combination really has some interesting potential.

Chihuahua and electronics
Just a cute little doggie watching me wire stuff together.

Smart home skills are great because they’re short and simple, and the supported device names can be extended dynamically through the “discovery” process.

Custom skills are great because they’re very flexible, and allow interactive dialog, unless something fits into a lot, isn’t extensible.

Putting the two together can provide the best of both. Here’s what a dialog with Alexa sounds like using both the Patriot smart home skill and the new Patriot custom skill.

Initially the skills don’t know about any activity called “computing”. So when I say:

“Alexa, turn on playing piano”, it responds with “Sorry, I didn’t find playing piano”.

That’s as expected. So let’s teach Alexa what we want it to do when we say “playing piano”. Note that I’ve made the invocation words “my lights”.

“Alexa, tell ‘my lights’ to turn on office when I say playing piano”

Then Alexa responds with:

“Ok, from now on when you say ‘playing piano’ I will set ‘office’ to 100 percent. This is a new activity, so you’ll need to tell me to ‘discover devices’ if you want to use the smart home command ‘start playing piano’.”

How cool is that?

So then saying “Alexa, discover devices” results in “Ok, found one new device ‘playing piano'”.

And then I can say “Alexa, start playing piano” and the office light comes on.

Using ASK CLI to Create a Custom Skill

When Amazon announced the ASK CLI a couple months ago, it created a simpler and more powerful way of creating and updating Alexa skills. We’re going to use the ask-cli to create an Alexa custom skill. In the next blog post we’ll extend that skill to interact with a Particle.io Photon using open source Patriot code.

Before the ASK CLI was available, I had to open multiple browser windows and edit data directly in the Amazon Alexa developer portal and AWS Lambda console. As a professional software developer, I’m accustomed to using powerful editors and source code management tools such as Git to track my changes. Being forced to enter data into a web browser page leaves a lot of room for mistakes. And tracking those changes with Git means having to cut/paste from a tracked local file to the browser, again leaving room for more mistakes.

The ask-cli goes beyond just allowing local files to be uploaded to an Alexa skill. It provides a start-to-finish set of commands to create, update, and publish skills.

So let’s see how the ask-cli can be used to create a new Alexa skill from the ground up.

Install and Initialize the ASK CLI

Refer to the Amazon documentation for instructions on installing and setting up the alexa skills kit command line interface (ask-cli). You’ll need to configure it with your Alexa developer account and an AWS account using the “ask init” command.

Create a New Skill

Now create a directory to contain your new skill, and run the “ask new -n <skillname> ” command. For example, I’m naming mine “Patriot”, so the command is “ask new -n Patriot”. This results in the following directory structure:

folder structure created by ask new

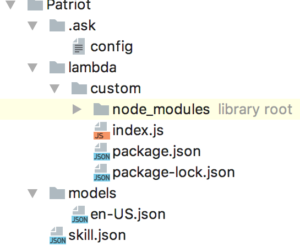
In one fell swoop we have created a basic “Hello World” Alexa custom skill. This includes the Alexa intent schema, utterances, and Lambda source and meta data. Pretty cool, eh?

Add Source to Git

If you use Git to track your source changes, now would be a good time to create a repo and add the files to it. This step is completely optional, but recommended.

Run the Skill

At this point, even without having changed anything, the new skill should work. Let’s upload it just to see:

ask deploy

If you’re accounts and ask-cli are setup correctly, then you should receive a series of messages indicating that the skill and lambda have been deployed correctly as shown here:

ask deploy
-------------------- Create Skill Project --------------------
Profile for the deployment: [default]
Skill Id: amzn1.ask.skill.your-new-unique-id...
Skill deployment finished.
Model deployment finished.
Lambda deployment finished.

Now if you check your Amazon Dev Alexa and AWS accounts, you should see that a new Alexa skill with the name you specified on the “ask new” command, and a Lambda  named “ask-custom-<name>-default” have been created. The default invocation word for the skill created by “ask new” is “hello world”.

By default, the new skill is not enabled for testing. Go to the test tab in the developer.amazon.com Alexa console console and enable it, and then you can test “hello world” on your Alexa device (Echo, Dot, EchoSim.io, etc).

Edit the Source Code

Ok, so now that you’ve seen the awesome power of a fully functioning death star, er I mean Alexa skill, we can commence to editing it to do something that we want beside telling us hello.

Now begins the iterative development process:

  1. Updating the source
  2. Deploying the skill
  3. Testing the skill
  4. Repeat

I strongly recommend that you make tiny changes each iteration, and use Git to check in each step of the way. That way you can back up a step if something breaks and you cannot figure out what.

There are 2 main source code files you need to work with. For simple skills, that’s all you need to modify:

  1. models/en-US.json (if you’re in the US, otherwise named for your language)
    contains the intents, slots, and utterances (now called samples)  that Alexa will respond to.
  2. lambda/custom/index.js
    contains the response to each intent.

By default your new skill will say “Hello” in response to launching the skill eg. “Alexa, open hello world”, or “Hello <name>” in response to “Alexa, tell hello world my name is <name>”. I recommend playing with the existing code, making small changes to the skill, redeploying it, and verifying that your changes act as expected.

Here are some things to try:

  1. Change the response to the SayHello intent from “Hello World!” to “Hello whatever your name is”. This should require just a change to line 25 of index.js.
  2. Change the help response. This is on line 43 of index.js.
  3. Add some additional samples to en-US.json for the user to say to invoke the two intents. For example, add “whats up,” between “hello”, and “say hello”,.
  4. Change the invocationName in en-US.json. For example, change “invocationName”:”hello world” to “invocationName”:”ahoy matey”. In addition, change the response in index.js to “Welcome aboard!”

If you don’t include quotes or commas where needed, ask will happily upload the broken code, and you won’t know until you test the skill. This is where a good Javascript editor comes in handy.

I’m not going to try to cover all the details of coding an Alexa skill here. There are lots of tutorials and blog posts in addition to Amazon’s documentation. I leave that as a homework assignment for you.

In the next article I’m going to show how to update this skill to send on and off commands to the LED on a particle.io Photon.

The Particle Libraries 2.0 works great!

I’ve built up quite a few Photon C++ files as part of my RV home automation projects, and have been noodling over how best to share these. I’d decided to release all the source on Github, but realized that just throwing a few dozen files out there probably wouldn’t benefit anybody. Well, when I saw Particle’s recent announcement for the libraries 2.0, it looked like exactly what I was looking for.

I’m delighted to say at this point that it appears to working great, and has simplified the process that I’ve been using to date. I currently use a combination of Git, shell scripts, shared C++ files, and the particle cloud compiler and flash to build the files for each of my controllers. It’s quick and works reliably, but it’s complicated and I dread trying to document and explain to someone else how to do the same thing.

So instead, it looks like Particle’s libraries 2.0 is going to make sharing quite easy.

First, I converted all my shared files into a single IoT library. This was fairly easy using the Particle CLI library functions.

Then I created several examples and included them in the IoT library’s examples directory. One of the cool things about these are that they can be built using the CLI, Particle Dev, or the cloud IDE. And since they’re a single file about a page long, any of those options work well.

Finally, I converted each of my controller’s source directories to use the Particle project format which creates a project.properties file. This allows then adding the IoT library to the project.

So now to build a project I need only run ‘particle compile photon’ in the project’s directory. To flash the project to the device, I use a shortcut where I name the project’s directory the exact same thing as the controller’s name. Then I can run the command ‘particle flash ${PWD##*/}’ and it compiles and flashes the code to the device with the same name as the directory.

And of course I created aliases in my .bash_profile so I can run them using just ‘b’ or ‘f’ from within any project directory.

The library code is probably still quite buggy, but I’ll be actively updating as issues are found. I’d love to hear your experiences with it, and reports of any problems. The source code is on GitHub at https://github.com/rlisle/ParticleIoT.git, and the ready-to-use library uploaded and published on particle.io under the name “IoT”.

Self Discovering IoT System

I’ve been working for a couple years now to automate my RV using a combination of Particle.io Photon micro-controllers, an iOS app, and an Alexa skill. This has been fairly easy to do, due mostly to the ease of using the Particle.io API. Over the next year, in addition to adding additional functionality and more Photons, I hope to add Apple TV and Watch apps. This got me to thinking about how to make the system easier to configure and extend.

Since I’ve written all the software pieces myself (iOS app, Alexa skill, Particle sketches), up until now I’ve taken the expedient route of just hard coding the names of each controller into both of the apps. With only a single iOS app and Alexa smart home skill, this meant updating those two programs every time I added a new Photon, or extended one of the existing Photons. Not a big deal, albeit somewhat inconvenient.

However, recently I created an additional iOS app to allow using older iPhones to be mounted to the wall and used as control panels. Hard coding the names of the controllers into the apps means that I have to manually update each device whenever there is a micro-controller change. Now this is becoming a much bigger inconvenience.

So I’ve converted each micro-controller to be self registering with the system:

  1. Each Photon publishes several variables that list the device names it implements, in addition to what ‘events’ it listens for. These variables are exposed by the particle.io API and used by both the Alexa and iOS app to dynamically configure themselves.
  2. All applications use this information, instead of having to hardcode a list of commands.
  3. This functionality is built into a published IoT particle library, so copy/paste is minimized.

So now instead of needing to reprogram the Alexa skill and iOS control panel apps whenever I add a new controller, I just need to expose the data about that controller as described above, and all the applications pick it up.

I’ve posting the Photon and iOS code to Github, so please take a look and let me know what you think.

New Photon Based IoT PCBs

New IoTv2 PCBs

I’ve updated the printed circuit boards for my IoT projects. These boards are 5×5 cm and intended to be used in a variety of IoT applications. They include the following features:

  • Switch from linear voltage regulator to buck regulator.
    • The linear regulators used on my previous boards were getting quite warm as a result of converting the RVs +12 volts to +5 or +3.3v. I found some inexpensive variable voltage bucking regulators for about $1 each. These are marked “D-Sun”, readily available on Amazon.com, and they work well.
  • Provide direct pin-outs to LED driver boards.IoTv2 PCB with LED drivers
    • I’ve provided 4 sets of PWM pins that can interface directly with the Sparkfun 12959 MOSFET LED driver boards. I’ve positioned the pins such that standard header pins can be used to attach the boards instead of wires. I’ve gone back and forth about integrating the functionality directly, and finally concluded that the space used by the MOSFET and screw terminals was better pushed off onto small extension boards. Up to four of these can then be optionally added as needed. Sparkfun sells these for $4 each, so it’s sort of a no brainer. Putting them onboard would force me to moving to a larger 10×5 cm board, and only save a couple bucks.
  • Both 3.3v and 5v supplied
    • I’m using a 5v regulator to provide power to the Photon. It then has a 3.3v regulator for itself, and can provide 3.3v @ 100 mA to other sensors, etc. Since most of the Photons pins are 5v tolerant, this enables using both 3.3v and 5v sensors.
  • Provide groups of pins for ease of connecting other devices
    • To simplify adding additional sensors such as DHT11 temperature sensors, I’ve provided groups of pads that provide a GPIO, power, and ground. Some are 5v, and some are 3.3v. I was careful to ensure that the GPIOs provided with the 5v power groups are in fact 5v tolerant. These are great for things like PIR motion sensors, various switches, and so forth.

So after checking that the first batch of 10 boards work as intended, I’ve ordered another 10 and am in the process of replacing most of my existing controllers with these. While the Photon costs substantially more than the previous Arduino Pro Mini and RF24 radios, the ease of programming over the air combined with their robust design (5v tolerant pins, super stable operation) and included Particle.io support make these worth it!

I’m currently using my Echo and Dot to control these, but recently got AVS running on my Raspberry Pi and may throw that into the mix also.

If anyone is interested in using these boards in your own projects, post your request in the comments and I’ll provide links to the Eagle files so you can have boards made yourself. If you don’t mind waiting about 6 weeks, you can order these from itead.cc for $13 total for 10 boards. If you’re in a hurry, DHL shipping increases the total cost to about $26 total for 10 boards that arrive in less than 2 weeks. I ship with DHL for the first batch, then use the cheaper shipping to get more while I work with the first batch.

Note: I’ve now posted the Eagle files on Github.

How to connect Echo’s Alexa to an Arduino

Introduction

As mentioned in my last post, I have connected my Echo to interface with my Arduino controlled RV lights. And thanks to the Particle.io Photon, this was quite easy. Perhaps the toughest part about this process has been getting past all the unfamiliar language used by Amazon, such as “Lambda functions”, “Skills”, and so forth. The actual implementation was fairly quick and easy, as I’ll explain in this post and the accompanying GitHub project.

Who is Alexa, and what is an Echo?

In a nutshell, the Amazon Echo is a small electronic device that you can interact with using spoken natural language. It has directional listening capability that allows it to hear you talk even in a noisy environment; for example when you’re playing the TV or stereo. It responds to you after you speak the work “Alexa”.

Requirements for connecting Alexa to your Arduino

You don’t have to own an Amazon Echo to get started. You can design and build a voice controlled interface, and test it using the Alexa Skills Kit (ASK) Service Simulator. The simulator allows you to type in what you would speak, and responds exactly as the Echo device would.

You’ll need to join the Amazon developer program, and setup an Amazon account to handle the backend. Both of these things can be done for free.

I’ve posted all the details on Github. I’ll warn you though; the instructions appear quite long. But don’t be deterred. None of the steps are particularly difficult, and the results are amazing!

I’ve been sharing tips and ideas with my buddy Don. He’s setup his Echo to control his pipe organ clocks. You can check out his work on facebook or at donholmberg.com. There’s also a blog article on Mutual Mobile’s website talking about some of our Arduino projects before connecting them to the Amazon Echo.

I’m having a blast working with all this new technology, and its fun to be able to use it to enhance my RV lifestyle!

Alexa Control of RV Lights

Today I finally got all the pieces working to allow Alexa to control my RV lights. It turns out that the Alexa code only took a couple hours to implement, using a great tutorial posted by Kevin Utter on the developer.amazon.com site. This tutorial shows how to implement in under an hour a trivia game using Alexa. I followed the tutorial, created first a Reindeer trivia game, and then modifying it to be a Lisles Trivia game.

Once I was familiar with the process, I followed similar steps to create my own RvDuino Echo app. This app uses Alexa to listen for commands, and then forwards them to Particle.io which forwards them to a Photon Arduino.

I didn’t have to write any code on Particle.io. Code running on the Photon instructs Particle.io what commands to listen for, and which Arduino functions to run as a result. It really doesn’t get any easier than that. This has really made me a big Particle.io fan now!

I then used the Particle web IDE to write a fairly small Arduino sketch on the Photon that routes commands received from Particle.io to the desired Arduino Pro Mini over a simple RF24 network.

I’ve posted all the information and code on Github: https://github.com/rlisle/alexaParticleBridge.

iTead Studio Shipping Experiment

The least expensive PCB manufacturer that I’ve found so far is iTead Studio. They currently will create ten 5cm x 5cm 2-sided printed circuit boards for $9.90. Yes, that’s less than a dollar each.

They offer 3 different shipping options, so I decided to order 3 batches of PCBs, each using a different option, to assess the difference. I’ve now received all 3 batches, so can report my findings.

  1. Batch 1: ten 5cm x 10cm boards ($14.90) shipped least expensive ($4).
    Total turn around time: 4 weeks.
  2. Batch 2: ten 5cm x 5cm boards ($9.90) shipped medium cost ($4.50).
    Total turn around time: 3 weeks.
  3. Batch 3: ten 5cm x 10cm boards ($14.90) shipped most expensive (DHL $18).
    Total turn around time: 6 days.

Note that this was done in December, so I would expect future shipments to be faster when not done around the holidays. The processing time by iTead was about 3 business days.

On my first order, I had forgotten to include any dimension information in the gerber files. I received an email from iTead explaining what was needed, and providing a couple simple options for how to fix it. I uploaded a file to their site that included the needed info, and the order proceeded without delay.

So based on my results, I’m going to order parts using DHL shipping when I need fast turn around, and use the middle option when I have a the time to wait. For merely a 50 cent difference, I see no reason to ever use the cheapest option.

I am very impressed with the high quality and very low cost, and expect to continue doing business with iTead Studio for a long time.