Extending an Alexa Skill to Control Patriot Devices

In the last post I showed how to create an Alexa skill using the Alexa Skill Kit Command Line (ask-cli). In this post I’m going to show how to extend that skill to control the blue LED on a Particle.io Photon.

Prerequisites

This post assumes:

  1. You are already familiar with Photon development using the Particle.io IDE of your choice
  2. You have a particle.io account already setup.
  3. You have completed the previous post to create a starter Alexa skill using the ASK CLI.

Continuing Where We Left Off

By the end of the last post we had a working Alexa skill, although it didn’t really do anything interesting. Let’s change that and add some code to make it talk with a Photon controller using the particle.io API.

Let’s start by adding a couple intents to turn on and off a light:

Alexa, turn on the blue light

Alexa, turn off the blue light

Easy, right? We’ll add the intent first without it doing anything except responding “Ok”, then add the calls the the particle.io after that is working.

Basic Changes

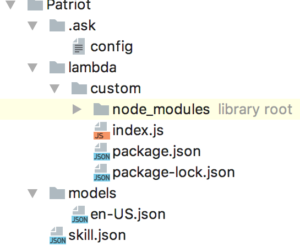
Let’s start by changing the invocationName on line 4 of en-US.json to “my photon”. Now we can say “Alexa, tell my photon to …”.

Adding a New Intent

Copied intent

Adding an intent will require defining it in the en-US.json file, and then creating an intent handler in index.js.

So open en-US.json in your favorite editor, and copy the entire HelloWorldIntent. After the copy, it should look as shown here.

Next edit the two copies to make them be our turn-on and turn-off intents.

Note: we could have used a single intent with a slot for the on/off state, but I’m trying to keep things very simple. Plus this allows you to use slang or fun expressions such as “light me up” or “gee, I feel blue”, etc.

So now we should have a TurnOnIntent and a TurnOffIntent defined. Let’s delete the previous MyNameIsIntent. So the final file should look like this:

Edited en-US.json file

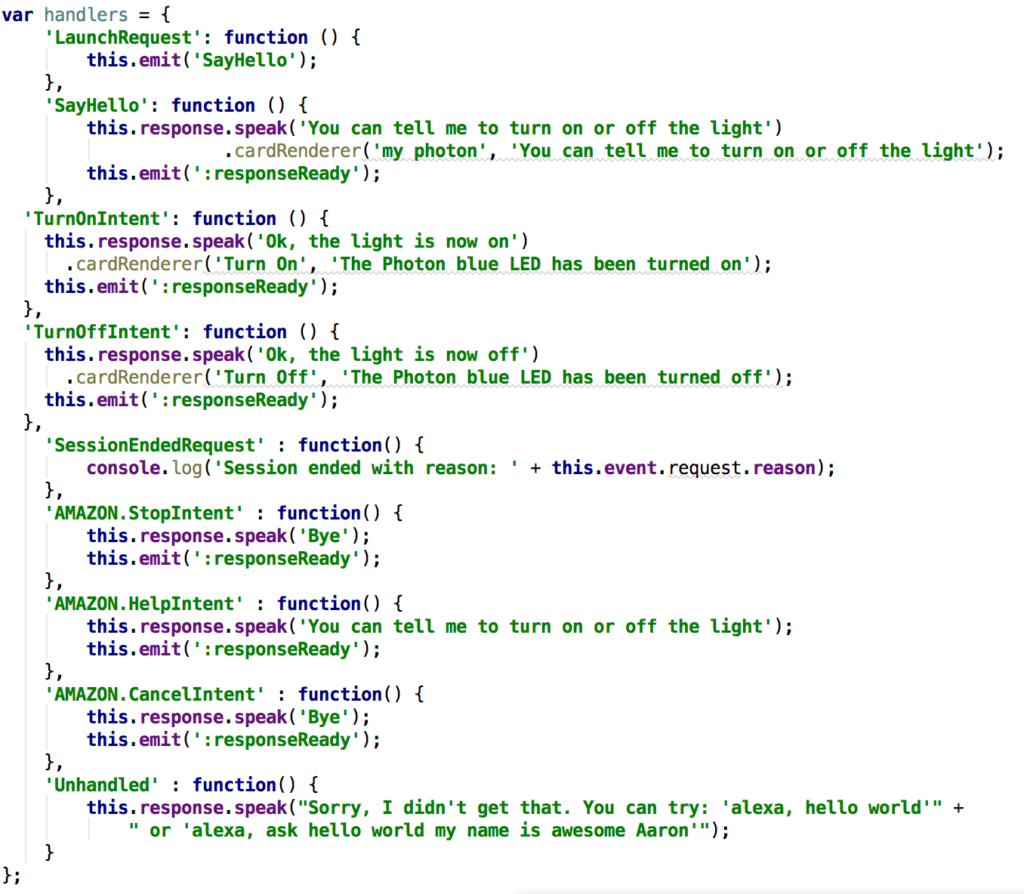
So now we need to handle the two new intents, and remove the deleted intent from the Lambda source. So open the lambda/custom/index.js file and make the following changes (or you can cut/paste the entire thing from the example below):

  1. Delete the ‘SayHelloName’ handler on line 29 through 34.
  2. Edit the ‘SayHello’ function to say something appropriate such as “You can tell me to turn on or turn off the light”. Update the cardRenderer() text similarly.
  3. Copy the same or similar text to the help intent.
  4. Delete the HelloWorldIntent and MyNameIsIntent
  5. Copy the SayHello intent twice
  6. Change the first SayHello copy to ‘TurnOnIntent’, and change the text to something like ‘Ok, the light is now on”, and provide more descriptive text in cardRenderer. The later is the text to be displayed on Show and in the Alexa app.
  7. Similarly, change the second SayHello copy to ‘TurnOffIntent’, and change the response and card text.

The index.js handler’s section should look similar to this after these edits:

Updated index.js

Now deploy the changes by entering “ask deploy” again. Test the updated skill by saying “Alexa, tell my photon to turn light on”. Make sure that you previously enabled testing in the Alexa skill test tab.

Verify that all of the intents work as expected, including:

  • Just launching the skill: “Alexa, open my photon”
  • Asking for help: “Alexa, ask my photon for help”
  • Turning on light: “Alexa, tell my photon turn light on”
  • Turning light off: “Alexa, tell my photon turn off”

If all that is working as desired, let’s move on to sending on/off commands to the Photon via the particle.io and Patriot open source library.

Adding the Particle Javascript SDK to our Project

So now on to the fun part. Alexa can now handle commands to turn something on and off, so we need to forward those requests to the particle.io API.

We’re going to use the particle Javascript SDK. I had posted code to Github a couple years ago called alexaParticleBridge using raw HTML calls, but since then Particle published their SDK that makes this a lot simpler.

So first we need to fetch and add the particle-api-js package to our project.

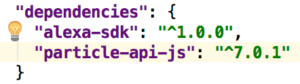
  • Edit lambda/custom/package.json to add the following line to the dependencies section:particle api dependency
  • Within the lambda/custom directory, run “npm update” to fetch the particle sdk modules.

Now we need to add the Particle object to our code. Include the Particle object in index.js by adding the following line near the top below the line that includes the alexa-sdk:

Code to include particle sdk

Setting Up Alexa Account Linking

Before we can call the methods of the particle object to communicate with our device, we need to give Alexa the credentials needed when calling the Particle API. We could hardcode our Particle account username and password into the skill, but that would be unwise and is totally unnecessary. Both Alexa and Particle.io provide support for using OAuth2.

Without getting into the messy details, what OAuth2 does in this case is to allow the Alexa skill to call a webpage provided by Particle.io. That webpage prompts the user to enter their username and password, and if valid will forward an access token to the Alexa skill that it can use to access the API. The Alexa code never has to know or even see the user’s credentials. How cool is that?

To get Alexa Account Linking working, we don’t really need to understand how OAuth2 works. We just need to know where to get the information needed. I’m going to step us through doing that.

Note: currently it doesn’t appear that the ask-cli supports uploading Account Linking information, so we’re going to need to enter the information directly into the Alexa developer website for the skill.

So open up a browser window to you Alexa developer account, and browse to the skill’s Configuration tab. The Endpoint information should already be filled in. Below that is the scary looking Account Linking radio button. Select Yes and a bunch of cryptic entry fields will appear. Let’s fill then in one-by-one:

  • Authorization URL: https://api.particle.io/oauth/authorize
    This tells Alexa the URL to display to prompt the user for their account login. This is a Particle.io provided website.
  • Client ID: particle
    This is provided to the Particle.io authorization URL. We will generate this in the next step, but for now enter “particle”.
  • Domain List (optional):
    Leave blank. It isn’t needed.
  • Scope: none
    Click on the Add domain button and add the scope ‘none’. It isn’t currently used, but may cause problems if something isn’t entered here.
  • Redirect URLs
    These are filled in for you. We don’t use them, so you can ignore them.
  • Authorization Grant Type: Auth Code Grant
    Select Auth Code Grant
  • Access Token URI: https://api.particle.io/oauth/token
    This provides Alexa with the URI to use when requesting or refreshing an access token. It is provided by Particle.io.
  • Client Secret: particle
    We will generate this in the next step. For now enter “particle”.
  • Client Authentication Scheme: HTTP Basic
    Leave this the recommended default.
  • Permissions:
    Leave these all unchecked.

Save this page. We’ll come back and enter the actual Client ID and Client Secret later.

Make a copy of one of the Redirect URLs. We’ll need it to create the client ID and secret in the next step.

Generate an Oauth Client

We need 2 things to create an oauth client:

  • Your particle.io access token
  • The redirect URL from the previous step

To get your particle.io access token, log into your particle.io account and go to the IDE. Select Settings (the gear icon in the bottom left) and assuming that you are logged in, the Access Token will be displayed near the top left. Make a copy of it for use in a moment.

Now we need to use your access token along with the Redirect URL saved in the previous step to create a valid Oauth client. These instructions assume you are running on a Mac and using the Terminal, but you could use any program capable of issuing Curl commands.

  • Open a Terminal or Command Line window
  • Issue the following command, substituting your redirect url and access token:
    • curl https://api.particle.io/v1/clients -d name=<your-skill-name> -d type=web -d access_token=<your-access-token> -d redirect_uri=<your-redirect-url>.

The response should include an id and secret. Make a not of these.

Warning: This is the only place that the secret will be displayed. Save it carefully. If you lose it and need it again later you will have to repeat the above steps to recreate a new id and secret.

Now go back to the Alexa Configuration page and enter and save the new Client ID and Client Secret you just created.

Whew! That should do it. Save this information, and restart your skill. When your skill is enabled in the Alexa app, it will display the Particle.io login screen where you can enter your user id and password. From then on, Alexa will automatically fetch a Particle.io access token that your code can use to access the Particle.io API.

Using the Access Token

Now that we’ve setup account linking, Alexa will pass an access token to our code with each request. It will be passed in the event session information event.session.user.accesstoken. Let’s update our code to get and save it.

var token = this.event.session.user.accessToken;

Sending Requests to Particle.io

Now all that’s left is to use the Particle object created to to send requests to our Particle devices using the token obtained above.  So lets create a function to call the Particle API Publish function:

publish function

Now we can add calls to this method in our intent handlers, and Publish events to our Particle devices. Here’s the TurnOnIntent and TurnOffIntent will the calls to publish():

TurnOnIntent and TurnOffIntent code

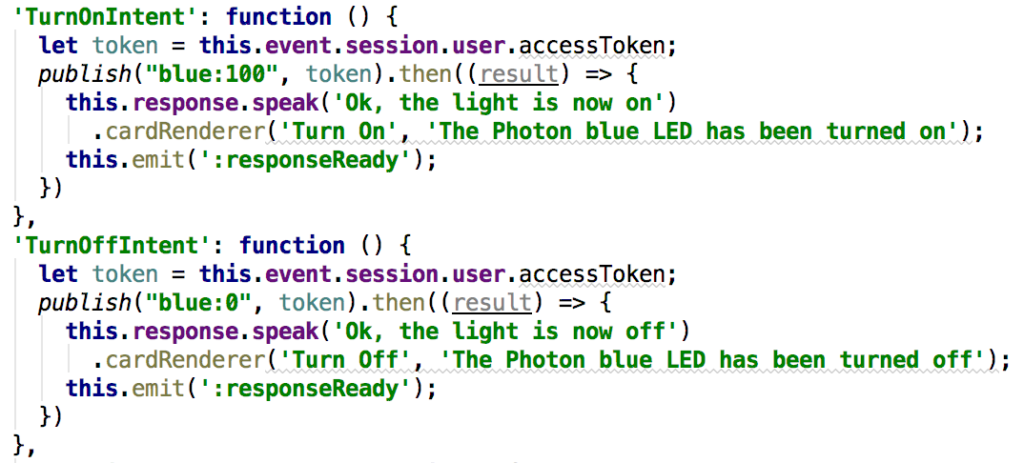
Note that a promise is used, and that emit is only called after the promise resolves. Also, the arrow function is used to allow “this” to continue to point to the response object.

So at this point we have a working Alexa skill that Publishes events to our Particle devices. In this example we used the device name “blue”. This needs to match the name you gave a device or activity in your Patriot code. I’m not going to duplicate the information about using Patriot, since I’ve posted several articles about that already. And of course you can call other particle API methods in addition to publish.

So this example should give you enough information to make function calls, set or read variables, and so forth. The complete project code is on Github. I hope you have as much fun with it as I have.

Caveat: I’m very much an intermediate Javascript programmer at best. I’m working with and learning from some really good Javascript programmers, but I’ve got a long way to go. Please don’t use my code as an example of the correct or best way to do things in Javascript.

Using ASK CLI to Create a Custom Skill

When Amazon announced the ASK CLI a couple months ago, it created a simpler and more powerful way of creating and updating Alexa skills. We’re going to use the ask-cli to create an Alexa custom skill. In the next blog post we’ll extend that skill to interact with a Particle.io Photon using open source Patriot code.

Before the ASK CLI was available, I had to open multiple browser windows and edit data directly in the Amazon Alexa developer portal and AWS Lambda console. As a professional software developer, I’m accustomed to using powerful editors and source code management tools such as Git to track my changes. Being forced to enter data into a web browser page leaves a lot of room for mistakes. And tracking those changes with Git means having to cut/paste from a tracked local file to the browser, again leaving room for more mistakes.

The ask-cli goes beyond just allowing local files to be uploaded to an Alexa skill. It provides a start-to-finish set of commands to create, update, and publish skills.

So let’s see how the ask-cli can be used to create a new Alexa skill from the ground up.

Install and Initialize the ASK CLI

Refer to the Amazon documentation for instructions on installing and setting up the alexa skills kit command line interface (ask-cli). You’ll need to configure it with your Alexa developer account and an AWS account using the “ask init” command.

Create a New Skill

Now create a directory to contain your new skill, and run the “ask new -n <skillname> ” command. For example, I’m naming mine “Patriot”, so the command is “ask new -n Patriot”. This results in the following directory structure:

folder structure created by ask new

In one fell swoop we have created a basic “Hello World” Alexa custom skill. This includes the Alexa intent schema, utterances, and Lambda source and meta data. Pretty cool, eh?

Add Source to Git

If you use Git to track your source changes, now would be a good time to create a repo and add the files to it. This step is completely optional, but recommended.

Run the Skill

At this point, even without having changed anything, the new skill should work. Let’s upload it just to see:

ask deploy

If you’re accounts and ask-cli are setup correctly, then you should receive a series of messages indicating that the skill and lambda have been deployed correctly as shown here:

ask deploy
-------------------- Create Skill Project --------------------
Profile for the deployment: [default]
Skill Id: amzn1.ask.skill.your-new-unique-id...
Skill deployment finished.
Model deployment finished.
Lambda deployment finished.

Now if you check your Amazon Dev Alexa and AWS accounts, you should see that a new Alexa skill with the name you specified on the “ask new” command, and a Lambda  named “ask-custom-<name>-default” have been created. The default invocation word for the skill created by “ask new” is “hello world”.

By default, the new skill is not enabled for testing. Go to the test tab in the developer.amazon.com Alexa console console and enable it, and then you can test “hello world” on your Alexa device (Echo, Dot, EchoSim.io, etc).

Edit the Source Code

Ok, so now that you’ve seen the awesome power of a fully functioning death star, er I mean Alexa skill, we can commence to editing it to do something that we want beside telling us hello.

Now begins the iterative development process:

  1. Updating the source
  2. Deploying the skill
  3. Testing the skill
  4. Repeat

I strongly recommend that you make tiny changes each iteration, and use Git to check in each step of the way. That way you can back up a step if something breaks and you cannot figure out what.

There are 2 main source code files you need to work with. For simple skills, that’s all you need to modify:

  1. models/en-US.json (if you’re in the US, otherwise named for your language)
    contains the intents, slots, and utterances (now called samples)  that Alexa will respond to.
  2. lambda/custom/index.js
    contains the response to each intent.

By default your new skill will say “Hello” in response to launching the skill eg. “Alexa, open hello world”, or “Hello <name>” in response to “Alexa, tell hello world my name is <name>”. I recommend playing with the existing code, making small changes to the skill, redeploying it, and verifying that your changes act as expected.

Here are some things to try:

  1. Change the response to the SayHello intent from “Hello World!” to “Hello whatever your name is”. This should require just a change to line 25 of index.js.
  2. Change the help response. This is on line 43 of index.js.
  3. Add some additional samples to en-US.json for the user to say to invoke the two intents. For example, add “whats up,” between “hello”, and “say hello”,.
  4. Change the invocationName in en-US.json. For example, change “invocationName”:”hello world” to “invocationName”:”ahoy matey”. In addition, change the response in index.js to “Welcome aboard!”

If you don’t include quotes or commas where needed, ask will happily upload the broken code, and you won’t know until you test the skill. This is where a good Javascript editor comes in handy.

I’m not going to try to cover all the details of coding an Alexa skill here. There are lots of tutorials and blog posts in addition to Amazon’s documentation. I leave that as a homework assignment for you.

In the next article I’m going to show how to update this skill to send on and off commands to the LED on a particle.io Photon.

Controlling things in my RV with the ControlEverything boards

Boards mounted behind panel

As described in my previous posts, I now have a pair of 8 relay boards from ControlEverything.com controlled by Alexa, an iOS app, and other Patriot devices. So now its time to get to work and actually install the boards and wire them up to the first control panel.


The front control panel in my RV contains the most switches, so I’m going to start there.

The top part contains switches for the vent (open, close, fan) and 5 other lighting switches. So I’m going to need 8 relays.

RV control panel top part

  1. Vent fan
  2. Vent Open
  3. Vent close
  4. High counter lights
  5. Low counter lights
  6. Sink handing lamps
  7. Kitchen ceiling lights
  8. Left side trim lights

RV front control panel

The lower section has a bunch of controls and indicators on it, but I’ll only be automating 7 of the switches:

  1. Ceiling lights
  2. Door side outside floods
  3. Opposite door side outside floods
  4. Front porch floods
  5. Front awning LEDs
  6. Front awning extend and retract

So I pulled each panel to see if there is room behind it for the 3″ x 7″ x 1″ boards. Unfortunately there is a water pipe hidden in the midst of all those wires that prevents pushing them back out of the way.

Front panel removed
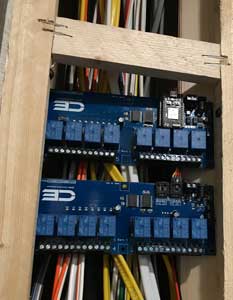
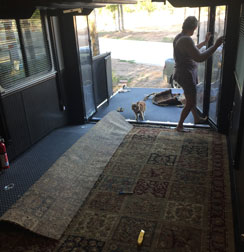
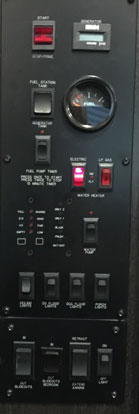
So my next step was to pull the entire panel as shown. This requires removing 8 screw covers and screws, and then loosing or removing some of the individual control panel screws because they went all the way through to the wood behind the panel.

This is where having a very supportive wife helps, because it looks pretty scary at this point.

Once removed, I could see that there was a ton of room in the bottom section, and sufficient room in the top section. After positioning the boards various ways in those sections, I realized that the bottom section would easily work, but the wire runs would be pretty long. So I considered  using the top section, then realized that the boards would fit at the top of the 2nd section, simplifying routing of the wires.

Boards mounted behind panelSo here you can see the boards mounted inside the wall behind the panel. The sides angle inward, so I was able to run a few screws through the holes in the corners of the boards to fasten them. Just by luck, the width of the opening is enough that I can get to the wire screw connectors on the boards.

So once the boards were mounted and 12v power applied, I could test the Alexa interface.

So next I just needed to connect the relays to the 15 switches. The screw terminals are easily accessible, so it’s a matter of just connecting the piggyback terminals and hooking up the 15 wire pairs.

So for each switch:

  1. Attach a pair of wires to the normally open (NO) relay terminals
  2. Attach a piggyback connector to each wire
  3. Remove the connector from the switch
  4. Attach the wire that was going to the switch to the piggyback connector that has the relay’s wire connected to it.
  5. Attach the piggyback connector to the switch.

The result is that the relay is connected in parallel to the light switch, and no wires have been cut.

So after attaching the first relay, I did a quick test with Alexa, and nothing happened. What? I could see the LEDs coming on, I could hear the relay flipping, but the light wasn’t coming on. So after about an hour of measuring the relay terminals, trying other relays, scouring the forums, whining and moping around, I finally figured out that the relays are mislabeled on the Photon 8-Relay board. Relay 1 is actually labeled relay 8. They’re backwards right-to-left instead or left-to-right. So I moved the wires from relay 1 to relay 8, and its working now.

Armed with this new information, I completed hooking up the other 14 relays, and now I can control most of the lights in the main room, the powered vent, about half of the outside lights, and the front awning and its LED strip lights.

Now I’m ready to order a couple more ControlEverything boards so I can tackle the smaller, rear control panel.

Automation Using the Control Everything Relay Board

ControlEverything.com boards

As I mentioned in the previous post, I’m going to give the ControlEverything.com boards a try. I’ve received the 8 relay Photon board, an 8 relay I2C expansion board, and the cable to interconnect them.

So to start off, I plugged a Photon into the 8 Relay Photon board, connected 12v to the board, and worked through their getting started tutorial.

I flashed the Photon with the example I2C scan code, and it immediately detected the I2C port at address 32.

Next I tried out the example from their NCD8Relay library on GitHub. This worked great. It toggles the relays in various ways. You can hear the relays toggling, in addition to seeing the status LED of each turn on and off.

So next I needed to figure out how to integrate this board with Patriot. Currently Patriot assumes a dedicated pin to control each device. Since the ControlEverything.com boards use I2C, I’d need to make some changes.

So next I created a new Patriot plugin library named NCD8Relay. This plugin should work with any of the NCD relay boards. There are two different I2C chips used on the boards, so addressing needs to take that into account. Since I don’t have any of the other sized relay boards, only the 8 relay photon and I2C expansion boards are tested at this point.

So having extended Patriot with the NCD8Relay plugin, I verified operation of the boards using both the iOS app and Alexa smart home skill. This all looks pretty good, so the next step will be to mount the boards behind the lighting control panel and wiring them up. That’s coming up in the next post.

RV Lighting Alexa Control

One of the lessons I learned from automating the lighting of my last RV is that I need to have a plan for what to do when it comes time to sell it. I didn’t have a plan, because I thought we were going to live in it until I died. Then it would be someone else’s problem. But now I know that I might have to replace the RV every ten years or so, so I’m going to be a bit smarter about it this time.

For the lighting for this RV, I am going to install my gadgets in a manner that doesn’t interfere with the operation of the existing switches. That way I can choose to simply disable the IoT automation, and everything will continue to work as it did the day I bought the RV. Also, I want to make it easy to remove the automation controllers without having the splice or repair any wiring going to the switches or lights.

Sainsmart Relay boards

To allow the switches to continue to work without automation, I’m going use relays connected in parallel with the switches. When using automation, the switches will be left off and the automated relays will open and close the circuit. When the relays are off or have been removed, the switches will continue to work as before. Since most of the lights are located in one of two control panels, that means I can probably handle most the lights with a pair of Photon controllers, each with a Sainsmart 16 relay board.

Piggyback Terminals
Piggyback Blade Terminals

To allow connection without modifying the wiring, I’m going to use piggyback blade connectors.

And of course, the Photon will be running the Patriot library to allow both iOS and Alexa voice control. Time to warm up the soldering iron.

Author update:

Upon connecting the Sainsmart 16-relay board to the Photon output pins (5v tolerant) I discovered that the relays are always energized. The 3.3v HIGH signal is  insufficient to turn off the relay. I could add level converters, MOSFETs, etc. to get this to work, but I don’t want all that extra circuitry flopping around when the RV is bouncing down the road. So I’m going to take a different tack.

Control Everything

In looking for Photon (3.3v) compatible relay boards, I came across some relay boards made by  ControlEverything.com. These contain various numbers of mechanical or solid state relays. They have a built-in regulator to allow 12v input to the board. And best of all the the Photon plugs directly onto the board. This will eliminate a bunch of wiring.

Even better, multiple boards can be daisy chained via I2C. So for example, I can start with an 8 relay board, then add an additional 8 relay I2C board without the need for another Photon. Surprisingly, the two 8 relay boards (with and without Photon) are a bit cheaper than a 16 relay board.

I’ve received the boards, and am starting to experiment with them. Things look very good so far, but I’ll need to modify the Patriot plugins to handle talking with the relays via I2C instead of direct pin mappings. I’ll be blogging about that in the next post.

P.S. Sainsmart has be great to work with, and I would definitely work with them in the future. This combination of parts just didn’t work out for this project. And no, they didn’t pay me to say that 🙂

Converting the RV Garage to an Office

One of the reasons why we chose a toy hauler for our new RV is the “garage” provides an additional room that can be fixed up to serve as a home office. We did that with our previous RV, and it worked out quite nicely. I think we’re going to be even more pleased with the one in our new RV.

Installing carpet
Carpeting the garage

So the first thing we needed to do to make the garage more livable was to install carpet. My wife Shelley had found a good deal on a used rug that was 9′ x 14′, so we trimmed it back to custom fit the 8′ x 13′ garage floor.

Carpeted Garage
Finished garage carpet

We had additional trimming to do around the corner bathroom and side door, but it worked out great!The 13′ garage is a bit larger on the 10′ garage on the last RV, and there is a small bathroom. So in addition to allowing us haul our motorcycle along with us, in can double as both an office and a guest bedroom.

It sports motorized queen size bunk beds that can be raised entirely up to the ceiling to make room for hauling multiple motorcycles, or lowered individually or together for sleeping. The bottom bed folds back to form a pair of benches, with a removable table between.

Picnic with Mom

On our last trip we took my mother-in-law with us up to Kansas for my son’s wedding. We made half the lower bunk into a bed for her, and left the other bench setup to use with the table for eating lunch, etc.

Another change that was needed was to provide power to the table that I’m using as a desk.


With an iMac, charging cords, and Amazon Echo, at at times a soldering station, I need several power outlets. I initially just ran extension cords, but quickly got tangled up in them. So I searched around and found some circular outlet boxes that provide both 120 vac outlets and USB ports. These mount through a hole I drilled into the table surface, and mount fairly flush.

Outlet in table

This allows using the table to eat, play games, etc. when not using the table as a computer desk. And of course the office balcone is awesome, especially when I can hang it over the edge of a lake.

Ron sitting in office by a lake
My office by the lake

A New RV Means New IoT Opportunities

The RV park where we stay most of the time will be enforcing a 10-year policy. This means that in order to stay here, my RV has to be 10 years old or newer. Unfortunately, the RV that I’ve been automating for the past few years is 10 years old. So the options are move, or replace it. Since we really like staying at this park, we’re choosing to upgrade the RV.

We looked at replacing it with another used RV. When I did the math though, it actually came out reasonable to purchase a new one that we can keep for 10 years as opposed to buying a used 5-year old unit then replacing it again in 5 year.

So after much shopping, searching, praying, and looking, we finally decided on a new Heartland Cyclone 4005. This is a huge 45′ toy hauler with most of the amenities included. Shopping around locally, it was a bit out of our budget. But searching nationwide for it, I found that it could be had for about $15,000 less if I drive north a couple states to pick it up.

Ron with new RV
Picking up the RV in Troy, Ohio.

So we ended up working with the Dave Arbogast RV dealership in Troy, Ohio to purchase it. Their price was as low as we could find, and the folks we easy to work with. We could have had the RV delivered to Texas for about $2,500, but we opted to drive up there and pick it up ourselves.

En route to picking it up, we swung a little bit out of the way to go by the Heartland factory in Elkhart, Indiana to take the tour of their toy hauler plant.

RV tour
Dustin giving us the tour of the Heartland Cyclone plant.

Serendipitously, the models being built were the exact same Cyclone 4005 model that we had purchased. Some were a different color with different options selected, but it was like watching our unit being built in various stages of completion. They must have about 12 units in the assembly line at one time working their way toward completion. This was a terrific tour and we enjoyed it very much. Dustin is the manager that gave us the tour, and he was great about explaining how and why they build them the way that they do. For not being a marketing guy, he sure made us feel very good about having chosen a Heartland RV, and the unit that we had picked. I took of course a thousand pictures, so I now have a pretty good idea of what’s behind the various walls, floor, and ceiling for when I go to customize or repair it in the future.

Since the Cyclone 4005 is a high end toy hauler, there really weren’t many options to choose from. The options that we got to choose were:

  • Upholstery color: we chose the dark brown over the medium brown color.
  • Optional ramp patio package and 3-season wall for the rear ramp. This allows the ramp to be folded down to become an outside deck. Since I’ll convert the garage into my office when not hauling a motorcycle, I think of this as my office balcony.
  • Full size residential refrigerator (with battery sine converters for staying cool on the road). Since we live full time in our RV, we need a full refrigerator, not the compact units typically found in RVs.
Control panel
One of two main control panels.

In addition, we had them add slide toppers. It was surprising that these were not included standard. Here in Texas, every bit of shade helps, and the roof of the slides is pretty thin and let a lot of heat in otherwise. Unfortunately, when we picked up the unit the slide toppers weren’t installed. So the the good folks at Arbogast RV worked with us and the Heartland factory to arrange to have the toppers shipped to us, and reimburse us when we get them installed.

So now I’m planning out how to automate this beast. I’m super delighted that there are a lot of LED lights in this RV, and most of the lighting controls are contained in 2 large control panels. This should make adding Photon controlled relays much easier and less expensive.

I’ll be blogging my IoT and other projects as I go. Stay tuned…


Patriot Plugin Architecture

Having released Patriot iOS and Alexa Smart Home skills, it’s time to get back to improving and extending the Particle.io Photon code. One of the obvious deficiencies with the existing code is that it requires that device support be built into the library. This is fast and really convenient if you just happen to want to use the included devices, but sucks if you have other devices you want to use. It’s all open sourced, so anyone can modify it however they’d like, but that sort of misses the whole point of Patriot: to allow hobbyists to focus on solving problems and not on how to build all the components. And the code is getting fairly complex, so it’s not a trivial task.

I’ve been thinking for awhile now that I’d need to add some sort of plug-in capability to greatly simplify adding support for new devices. This would also have the benefit of only including the code that’s needed by each particular sketch. Recently, there have been a few folks having trouble compiling the 3rd party DHT module. It seems that there are some differences between compiling natively and compiling in the Particle.io web IDE. An the irony is that DHT support might not even be needed for the folks having these problems. So my lazy solution is remove the DHT code and put it into a plugin.

So that’s what I’ll be working on for the next couple weeks. I’ll update this post with details as I work them out.

Patriot iOS App

Patriot iOS app
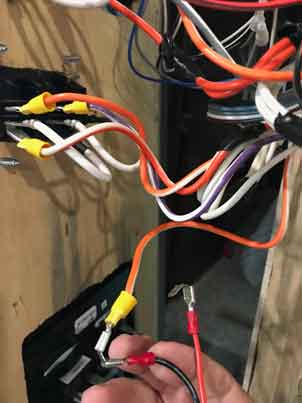
This weekend I posted to GitHub the source code for a Patriot iOS app. This is a cleaned-up version of an app that I wrote awhile back to control Photon devices in my RV. The intent is to allow mounting old iPhone devices to the wall to use as control panels for my Photon controllers. Refer to my previous article about Patriot for information about the Particle.io code and Alexa skill.

In the image here you can see 3 different ways of controlling a Photon controller. There is an Alexa sitting next to an iPhone 4s mounted to the wall next to several wall switches.

The Problem with Switches

The switches are connected to a Photon mounted in the wall behind them and actually broadcast particle.io events instead of directly controlling power to lights. They can control multiple lights, or even things that aren’t lights. I had intended to put a bunch of switches like these around my home, but there’s a problem with mechanical switches like these. They suggest a ‘state’ of on or off. So for example, typically a switch would be “on” if one way, and “off” if the other. However, if I turn a a light on by flipping a switch up, then I turn the light off by telling Alexa to turn it off, then the switch continues to indicate “on” but the light is actually off.

Alexa Smart Home Skill

The Alexa is running the Patriot Alexa smart home skill to dynamically determine the events that my IoT Photons are listening for, so I can tell Alexa to turn activities on or off. But as described above, this leaves normal switches indicating the wrong state. So I decided that I need some sort of switch that can change to reflect the state even when changed by other devices or switches.

Old iPhone Devices to the Rescue

So an obvious choice is to use motorized switches. Unfortunately I couldn’t find any in my parts locker. But I did come across several old iPhones and began to think about how extremely powerful these could be to control my IoT devices. So I wrote a simple control panel app that displays the state of a list of hard coded activities, and allows tapping on them to toggle their on/off state. I then purchased some cheap plastic iPhone covers for them that I mounted to the walls, and can just snap the iPhones into place to hold them on the wall. I ran a power wire over, and voila!

Nice, works ok, but my head nearly exploded when I started thinking about  all the ways these could be extended. Before I start going on about possible future enhancements, let me announce that I have cleaned this original code up, extended it to use the latest Patriot dynamic device discovery, and posted the Swift source to Github.


The Possibilities of Patriot iOS Control Panels

So now that we have a system that allows old iPhones to communicate with our IoT system, what are some of the things that we can do to leverage the incredible power of these cheap devices? Here’s just a short list of some things that I’ve come up with so far:

  • Utilize BLE to detect the presence of certain other iPhones to monitor my comings and goings. Turn on lights when I get home after dark, etc.
  • Put a BLE tag on my car and motorcycle to track when they are at home or away or being stolen. Combined with the above…
  • Coordinate with Alexa commands to dim or display the panels.
  • Provide other views such as video chat, monitoring outside, etc.
  • Mount one of these outside to use as a doorbell with camera and audio intercom.
  • Use the back facing camera to perform motion detection, face recognition, etc. This one really has my head spinning. I intend to start looking into OpenCV to see about replacing simple motion and proximity detectors with just the camera mounted on the iPhones.
  • Motion detection and GPS: since my home is an RV, these may prove handy for a lot of things.

And the list just goes on and on. So this iOS code is intended as just a starting point. I hope others will get involved and contribute also.

The Particle Libraries 2.0 works great!

I’ve built up quite a few Photon C++ files as part of my RV home automation projects, and have been noodling over how best to share these. I’d decided to release all the source on Github, but realized that just throwing a few dozen files out there probably wouldn’t benefit anybody. Well, when I saw Particle’s recent announcement for the libraries 2.0, it looked like exactly what I was looking for.

I’m delighted to say at this point that it appears to working great, and has simplified the process that I’ve been using to date. I currently use a combination of Git, shell scripts, shared C++ files, and the particle cloud compiler and flash to build the files for each of my controllers. It’s quick and works reliably, but it’s complicated and I dread trying to document and explain to someone else how to do the same thing.

So instead, it looks like Particle’s libraries 2.0 is going to make sharing quite easy.

First, I converted all my shared files into a single IoT library. This was fairly easy using the Particle CLI library functions.

Then I created several examples and included them in the IoT library’s examples directory. One of the cool things about these are that they can be built using the CLI, Particle Dev, or the cloud IDE. And since they’re a single file about a page long, any of those options work well.

Finally, I converted each of my controller’s source directories to use the Particle project format which creates a project.properties file. This allows then adding the IoT library to the project.

So now to build a project I need only run ‘particle compile photon’ in the project’s directory. To flash the project to the device, I use a shortcut where I name the project’s directory the exact same thing as the controller’s name. Then I can run the command ‘particle flash ${PWD##*/}’ and it compiles and flashes the code to the device with the same name as the directory.

And of course I created aliases in my .bash_profile so I can run them using just ‘b’ or ‘f’ from within any project directory.

The library code is probably still quite buggy, but I’ll be actively updating as issues are found. I’d love to hear your experiences with it, and reports of any problems. The source code is on GitHub at https://github.com/rlisle/ParticleIoT.git, and the ready-to-use library uploaded and published on particle.io under the name “IoT”.